
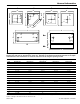
Installation Guide
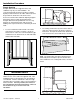
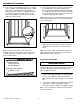

3. Place cardboard, or similar scratch resistant
material, in the bottom of the shower base to
prevent possible damage during construction.
The shower base/floor installation is now
complete. DO NOT discard these installation
instructions. PLEASE LEAVE THEM WITH THE
HOMEOWNER.
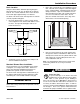
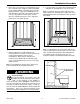
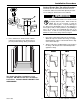
Optional Shower Base Toe-nailing Procedure
If desired, after the shower base has been set into a
mortar base and leveled, follow this optional procedure
for toe-nailing the shower base to the stud wall.
The shower base must be set in a bed of mortar
to properly hold it in place. Nails can also be
added, but are not necessary, to hold the
shower base in place. To prevent damage to
the shower floor and possible water or other damage to
floors, pipes, walls, or other portions of your building or
home, do not nail or screw through any part of the
shower floor. If nails are used, they must be installed
above the shower base flange and not through it.
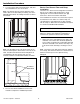
1. Drive large head (roofing) nails into the studs just
above the top of the shower base flange, at a slight
downward angle until the head is flush with the edge
of the shower base lip.
2. Tap the head of the nail downward so it is just above
the flange. Do not put side or downward pressure
against the flange.
YES NO
WARNING
3
1
2
800-325-7008 13 The Swan Corporation – Swanstone
Installation Procedure