
Installation Guide
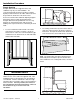
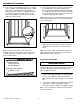


5. Place a layer of mortar/thinset on the floor. This will
ensure complete contact and support by the existing
floor surface, eliminating shower floor ramp flex
during normal use. Taper the mortar/thinset toward
the front (thin) edge of the shower ramp. Do not
place the mortar/thinset material close to the front
edge of the shower ramp.
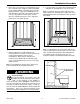
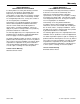
Note: The barrier free shower floor ramp can be
installed on the same floor surface as the shower floor
or can be installed on raised floor surface (up to 1/2”
thick), as shown below.
6. Firmly press the barrier free shower floor ramp into
the mortar/thinset. The back (tall) edge of the
shower ramp must engage all eight of the stainless
steel clips to prevent the shower ramp from moving.
The front (thin) edge of the shower floor ramp must
completely contact the floor surface.
Note: Clean up any excess mortar/thinset and allow the
mortar/thinset under the barrier free shower floor ramp
to cure for 24 hours.
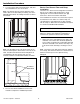
7. Apply a bead of 100% silicone sealant to seal the
joint between the shower floor and shower floor
ramp.
Note: If the shower walls extend past the shower floor,
apply a bead of silicone sealant at the joint where the
walls and shower floor ramp meet.
Floor Drain Installation
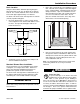
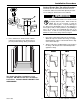
If no-hub, cast-iron drain pipe is used, make sure the
end of the pipe is free of nicks, cuts, or burrs. To ensure
a proper seal, lightly sand the drain pipe with emery
paper or “0000” steel wool.
1. Lubricate both caulk seal gasket (1) and drain pipe
(2) with either liquid hand soap or dishwashing
liquid, and slide the caulk seal gasket over the drain
pipe.
2. Complete the installation by snapping strainer plates
(3) into place. With metal strainers, it may be
necessary to bend the strainer tines slightly outward.
Note: If you need to pry the strainer up from the drain,
you have a proper fit.
IMPORTANT NOTICE
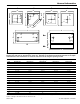
Ramp Installed on
Raised Floor Level
(1/2” max. thickness)
Ramp and Shower Installed on
Same Floor Level
The Swan Corporation – Swanstone 12 800-325-7008
Installation Procedure