
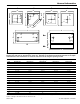
Installation Guide
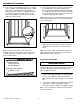

2. Place up to a 1/2” thick layer of mortar/thinset on the
floor. This will ensure complete contact and support
by the existing subfloor, eliminating shower floor flex
during normal use. Taper the mortar/thinset to 1/4”
thick around the floor drain. Mix enough material to
cover the area under the shower base. Do not
place the material closer than 2” to the edge of the
shower floor or the drain opening.
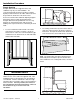
3. With the stainless steel clips installed on the
threshold, place the barrier free shower floor into the
rough opening and firmly press it into the
mortar/thinset. Make sure the side lips of the
shower floor are parallel with the wall with a gap
(3/16” recommended) between the face of the stud
and the side lip.
Note: The mortar/thinset will prevent the shower floor
from moving without any mechanical fasteners.
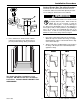
Do Not Use Nails
To prevent damage to the shower floor and
possible water or other damage to floors, pipes,
walls, or other portions of your building or
home, do not nail or screw through the shower floor to
secure it to the stud wall. Nails can be used, but are not
necessary, to hold the shower base in place. If nails are
used, they must be installed above the shower flange and
not through it. Refer to the specific instructions in this
manual for the proper installation of these optional nails.
4. Level the barrier free shower floor in both directions,
and allow the mortar/thinset to cure for 24 hours.
Note: For optional, but not required, fastening of the
shower base to the stud wall by toe-nailing, refer to the
Optional Shower Base Toe-nailing Procedure section in
this manual.
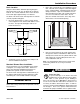
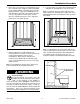
Note: The ideal placement of the shower base is 1/2”
from the inside lip of the shower base to the face of the
stud. This dimension allows the Swan wall panels to
rest against the lip of the shower base once the
moisture-resistant cementboard is installed, as shown.
Cementboard
Two Surfaces
Must Be Flush
1/2"
WARNING
800-325-7008 11 The Swan Corporation – Swanstone
Installation Procedure