
Installation Guide


3. Level the shower base in both directions, and allow
the mortar/thinset to cure for 24 hours.
Note: For optional, but not required, fastening of the
shower base to the stud wall by toe-nailing, refer to the
Optional Shower Base Toe-nailing Procedure section in
this manual.
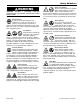
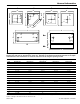
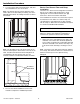
Note: The ideal placement of the shower base is 1/2”
from the inside lip of the shower base to the face of the
stud. This dimension allows the Swan wall panels to
rest against the lip of the shower base once the
moisture-resistant cementboard is installed, as shown.
4. Refer to Floor Drain Installation section in this
manual to complete the installation procedure
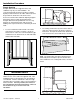
Barrier Free Shower Floor and Ramp
Installation
The barrier free shower floor is designed to be installed
directly on the subfloor and should fit in the rough
opening with a recommended minimum 3/16” gap
between the shower floor and the wall studs .
If the installation of the barrier free shower floor requires
the attachment of the barrier free shower ramp, it is
essential that the eight stainless steel clips, included
with the ramp, be attached to the threshold of the barrier
free shower floor before final installation.
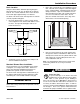
For best installation results, it is suggested to install the
barrier free shower floor and shower ramp using a
mortar bed or equivalent material, such as thinset.
1. Attach each of the eight stainless steel clips to the
underside of the shower floor threshold, positioned
so they will be located between alternating structural
ribs on the underside of the shower floor ramp. Dry
fit the shower base and ramp, checking for correct
fit.
Note: The bottom of the clips must contact the subfloor.
If necessary, shim under the barrier free shower floor for
subfloor contact to prevent the clips from being
dislodged.
IMPORTANT NOTICE
Cementboard
Two Surfaces
Must Be Flush
1/2"
The Swan Corporation – Swanstone 10 800-325-7008
Installation Procedure