steam generator Model: SI9030N Instruction Manual
Important safeguards 1. 2. 3. 4. 5. 6. 7. 8. 9. 10. 11. 12. 13. 14. 15. 16. 17. 18. 19. 20. 21. 22. Make sure to read all the safety precautions below and look at the illustrations before you start using the appliance. Use the appliance for its intended use only. The appliance is intended for household use only.
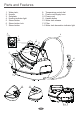
Parts and Features 1. 2. 3. 4. 5. 6. 7. Water tank; Handle Soleplate; Heating indicator light Steam button Steam button lock Steam button 8. 9. 10. 11. 12. 13. 14.
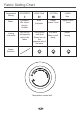
Fabric Setting Chart WOOL SILK COTTON Temperature Setting SYNTHETIC Fabric Synthetics, Silk, Nylon, Arcrylic, Acetate Wool, Polyester Rayon cotton, Linen Dry Iron on the opposite side of the fabric Use a press cloth and Steam Iron on the opposite side of the fabric Iron while fabric is still damp Ironing Instruction LINEN Max Steam Selection Temperature control dial 4 Rayon cotton, Linen Steam Ironing
Ironing Temperature Setting Guide 1. Follow up the ironing instructions on the garment label. If there is not any instruction label, but you know what the fabric is, please refer to the fabric setting chart described in this instruction manual. 2. The fabric setting chart is only valid for plain fabrics and not for materials to which finishes, glosses etc, have been applied. Textile to which some kind of finish has been applied (gloss, crinkle, relief etc.) is best ironed at lower temperature. 3.
How to use your steam station Prepare the appliance for use: 1. Check if the rating indicated in the rating plate corresponds to the mains voltage in your home. 2. Press handle button to lay handle down. Fig.1 3. Remove the protective foil or sticker or card from the soleplate. 4. Fully unwind and straighten the power cord and the supply hose. 5. Place the appliance on a stable, level and horizontal surface such as an ironing board. 6. Place the iron onto the iron rest plate horizontally at the base unit.
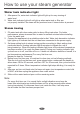
How to use your steam generator Water tank indicator light 1. After power On, water tank indicator light will light up for easy viewing of water level. 2. Water tank indicator light will not light up when water tank or filter are not properly installed. No steam will be produced even if steam button is pressed. Steam ironing 1. Fill water tank with clean water refer to above filling instruction.
How to use your steam generator Dry ironing 1. Connect the appliance to a suitable socket outlet. Water tank indicator illuminates to indicate that the unit has been connected to the power supply 2. Set temp setting knob to desired position according to above ironing temperature setting guide or fabric setting chart. Heating indicator light on iron unit will turn on to indicate that the steam chamber being heated up.
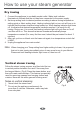
Auto-locking function for steam button Press down steam button lock and then push it backwards, steam button will automatically lock . Steam will be produced continually. If you want to stop steam, please push steam button lock forward. Notice: Always turn steam lock off when resting iron on its base or if you leave the iron unattended Pump overheat protection function The pump has an in-built overheat protection circuit. When water in water tank has been used up the pump will be hot.
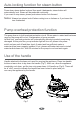
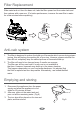
Filter Replacement Slide water tank out from the base unit, take the filter upward out from water tank,and then replace with a new one. (For better performance, immerse the new filter in water for a few minutes before replacing) old new Anti-calc system 1. The filter is designed to reduce the build-up of limescale which occurs during steam ironing, this will prolong the working life of your iron. However, please note that the filter will not completely stop the natural process of limescale build-up. 2.
Cleaning and Maintenance: 1. Unplug the appliance from the main supply and let the iron completely cool down. 2. Clean the iron with a damp cloth. 3. Wipe off scale and any other deposits on the soleplate with a damp cloth or non-abrasive(liquid) cleaner. (Fig.10) 4. Never immerse any part of the appliance in water. Fig.