
Instructions / Assembly


INSTRUCTION SHEET
PRODUCT: 64689 E-SPEC 2 Bike E-bike Rack • Page 1 of 3
Swagman • 300 - 1880 Government St. • Penticton, B.C. Canada V2A 7J1 • Phone (250) 490-8883 • Fax (250) 490-8885 • www.swagman.net
REV 15/05/18
Assembly Instructions:
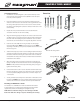
1. Assemble the crossbars (Diagram 1). The crossbar is made up of one
male section (A) and one female section (B). Make sure both square
holes are positioned upward.
2. Place the assembled cross bars onto the main assembly so that the
small set screw holes at the end of the bar are facing downwards. Insert
the carriage bolts (A) into the holes on the cross bars and secure with
the washer and nut (Diagram 2). Note the orientation of the bars on the
main assembly.
3. Repeat the same procedure with the second crossbar. Note the
orientation of the bars on the main assembly.
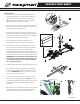
4. Align the ratcheting upright arm (C) onto the center section of the main
assembly. Position it so that it folds to the right side when viewing from
the back of the vehicle (Diagram 3). This will allow for easier use of the
ratchet hooks. Secure with the two carriage bolts (B), washers and nuts.
5. Install one short hook (D) and one long hook (E) onto the upright
ratchet arm (Diagram 4). NOTE: the long hook goes on rst. NOTE:
depending on the bikes you may have to install the short hook rst and
then the long hook.
6. Slide the wheel trays (F) onto the cross bars (Diagram 4). The wheel trays
should be orientated so that the upsweep is on the inside of the rack and
the buckles and knobs are facing the outside of the rack. Your bike size
will determine the best position for these 4 wheel holders. Review bike
Installation for more details.
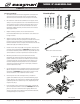
7. After all the wheel trays are installed you will need to install the self
taping screws (G) into the underside ends of each crossbar (Diagram 5).
NOTE: This will prevent the wheel tray from sliding o if you forget to
tighten the wheel tray knob.
8. Insert the bike rack into the 2” receiver. Install the 5/8” threaded locking
hitch pin and tighten to 50 ft. lbs. (very tight). Put on the lock head until
it is securely attached (Diagram 6). Never use a 2” with an adaptor to a
1-1/4” receiver.
9. To lock your bikes rotate the key in the ratchet hook so the button cannot
be depressed. NOTE: Never leave your bikes unattended for any length
of time. Locks are meant as a deterrent and won’t prevent bike theft.
Mounting on Fifth Wheel or Trailer:
For installation on a Fifth Wheel or Trailer use Hardware Kit included.
To mount the E-spec you must remove the folding pin and install the
supplied bolt, washers and nut (Diagram 4). Tighten securely.
NOTE: Failure to make this change can cause damage to the Bike
Rack and or bikes. The change is require to maintain your warranty.
2
Carriage Bolts (A)
3
(C)
Parts List
A
B
G
1
(B)
(A)
Screw Hole Facing Down
Square Hole
Screw Hole
Facing Down
Carriage
Bolts (B)