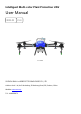
Intelligent Multi-rotor Plant Protection UAV User Manual 2021.01 V1.0 EA-20XE SUZHOU EAVisionROBOTIC TECHNOLOGIES CO., LTD Address: Unit 1-A, No.3 Workshop, 28 Xiasheng Road, SIP, Suzhou, China Website: www.eav.
FCC STATEMENT : This device complies with Part 15 of the FCC Rules. Operation is subject to the following two conditions: (1) This device may not cause harmful interference, and (2) This device must accept any interference received, including interference that may cause undesired operation. Warning: Changes or modifications not expressly approved by the party responsible for compliance could void the user's authority to operate the equipment.
1. Product Overview .......................................................................................................................................................................... 3 2. Disclaimer ...................................................................................................................................................................................... 5 3. UAV Composition .....................................................................................................
8.1.4 Flight Record ..................................................................................................................................................................44 8.2 Team Management .......................................................................................................................................................... 45 8.3 Employee Management .............................................................................................................................
1. Product Overview EA- 20XE Series full-scope perception intelligent plant protection UAV is an intelligent multi-rotor plant protection UAV released by Suzhou EAVision Robotic Technologies Co., Ltd. Based on the industry-leading stereovision technology, the UAV can complete plant protection services of various fields crops and cash crops.
improve operation management efficiency and increase economic value. Intelligent Battery: 3C fast-charging is available, and the battery can be maintained autonomously. Battery charging and maintenance more convenient than the previous generation. We have completed plant protection services of tens of thousands of hectares in total for crops such as rice, corn, wheat, apple, sugarcane, banana, pitaya, grapefruit, orange, bean and dates in many places in China.
2. Disclaimer Thank you for choosing the EA- 20X Eseries full-scope perception intelligent plant protection UAV developed and manufactured by Suzhou EAVision Robotic Technologies Co., Ltd. (hereinafter referred to as "EAVision").
UAV management regulations and local airspace control regulations carefully before use. Once you use this product, you will be deemed to have read the relevant regulations and documents. EAVision will not be responsible for any legal liability arising from the use of this product in violation of the laws and regulations. While using the UAV, please ensure that the power supply system works well and arms of UAV are in the right position. Keep the UAV away from crowd and dangerous articles.
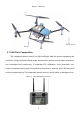
3. UAV Composition EA- 20XE Series full-scope perception intelligent plant protection UAV can plan the flight route in real time through intelligent algorithm, and it can operate with high efficiency. With GPS/RTK positioning technology, the positioning precision of EA- 20XE series can reach centimeter-level.
Figure 3 UAV Parts Spray Nozzle Holder 3.1 UAV Parts Composition The integrated remote control is a UAV intelligent data link system integrating the functions of high-definition digital image transmission, remote control data transmission and centimeter-level positioning. It integrates ESC calibration, voice broadcast, onebutton parameter-setting and other practical functions to improve work efficiency and reduce complex setting. The integrated remote control is much easier to debug and use.
4. Technical Parameters 4.1 Frame Parameter Wheelbase: Dimensions(exclude 1092mm@front&back propeller): 1370mm@left&right 1190*1480*560 Arm Length:525mm (mm) Weight (no load):25.9kg Size (folded):630*710*560 (including 4 high pressure (mm) nozzles & 2 mist nozzles) 4.2 Spray Parameter Chemical Tank Capacity: 20L Droplet Size:40-150 μm Spray Type: Pressure + mist Flow Rate:1.
4.3 Battery Parameter Battery Type: Lithium Battery 13S Charging Temperature:0-- Voltage:48.75V 45℃(environment Power:975Wh temperature) Weight:About 6.7Kg Charging Time: Max Charging Power:3032W Fast-charging: 20min Working Temperature:0-- 45℃ Slow-charging: 60min (ambient temperature) 4.4 Charger Parameter Battery Model:JM1-20000mAh- Output Voltage:30-55.9VDC 48.
5. Check List before Use 5.1 Materials ⚫ Integrated Remote Control ⚫ EA- 20XE Series Full-scope Perception Intelligent Plant Protection UAV ⚫EAvisionAgriculture APP ⚫ Battery ⚫ Charger(remote control charger,main battery charger) 5.2 Remote Control ⚫ Check whether the remote control antenna is damaged and whether the screws are loose. ⚫ Open the remote control and check the battery power. Please charge the remote control in time if the battery power is lower than 50%.
5.4 Battery ⚫ Check the battery power before operation. ⚫ Check the battery. In case of any abnormality, Don't use it. ⚫ Check whether the battery charging port is clean. If there are foreign materials, please use alcohol pad or clean insulation to wipe the electrodes (Don't wipe two electrodes at the same time), or the battery charging port will be melted. 6. Operating Instructions 6.1 APP Installation The EAVision Agriculture APP can run in Android 4.2 version and above.
6.2 Function Check After connecting the wire of the system module, it is necessary to check whether the links and functions of each module are normal. The function check must be completed when the propeller are unloaded. The steps are as follows: 6.2.1 Communication Check Turn on the power of the UAV and the remote control (the communication mode of the remote control should be switched to the mode that is compatible with VK-fly, you can set it on the remote control APP).
6.2.2 Remote Control Calibration Compare with the amount of rudder travel of the remote control channels on the APP and confirm whether the amount of rudder travel of the remote control channels need to be reversed. If the definition of pros and cons of the channel is not in accordance with what the APP displays, then the amount of rudder travel need to be reversed in the debug software of the remote control.
When the calibration is completed, you can check whether the setting and calibration is correct according to the description on the APP.
6.2.3 Motor Check 1) ESC Calibration Remove the blades, push the aileron and accelerator of the remote control to the maximum at the same time, and then power on the flight control and the ESC concurrently, the flight control will enter the ESC calibration mode, purple light flashes 4 times. The ESC will make a dripping sound. It means that the ESC has entered the calibration mode.
6.2.4 Flight Settings Complete plant protection and flight settings as the figures below.
6.2.5 Firmware Check Check the firmware version. Make sure the firmware is the latest version. Figure 10 Firmware Version Check 6.2.6 Water Pump/Flowmeter Test In order to achieve precise spray, the flowmeter and water pump should be calibrated before use. Before calibrating the water pump / flowmeter, check the spray system first. For example, add 10L chemical into the chemical tank first, turn on the water pump, and check whether the spray system works normally.
1) Flowmeter Calibration Fill the chemical tank with water. For example, if the chemical tank is 10L, fill the tank accurately to 10L. Enter the "Pump" page, fill in 10 for the tank capacity and 0 for the coefficient, and then tap "Calibrate Flowmeter", the water pump will spray water automatically, wait for the water pump to stop automatically after all the water in the tank is sprayed, and then tap the "Settings" button to complete the flowmeter calibration.
6.2.7 Flight Calibration 1) Voltage Calibration The main battery voltage detected by the flight control system may deviate from the actual battery voltage. At this time, you need to calibrate the voltage. Fill in the real battery voltage on the "Real Voltage" of "Flight Calibration" page, and then tap "Calibrate" to complete the voltage calibration.
Figure 12 Parameter Setting Deviation of GPS Installation 21
6.3 Debug during Flight 6.3.1 Magnetic Compass Calibration After finishing the installation check, the UAV can be tested in the field. Magnetic compass calibration should be completed before the flight. The calibrating method is as follows: Toggle the Channel 5 of the remote control for 8 times consecutively or enter the "Flight Calibration" page on the APP. Tap "Geomagnetic Calibration" button, the LED indicator light will turn green, and the UAV will enter horizontal calibration mode.
Rotate the UAV with the head points up. If the indicator light (blue) flashes, it means calibration succeeded; if the indicator light turns red, it means calibration failed, and the UAV needs to be calibrated again. 6.3.2 Debug of Sensitivity For the first flight, please confirm whether the angle of the UAV is correct. Unlock it in the attitude mode to test whether the corresponding relation between the steering gear and the motor is normal.
Description: ① R / P Gain: adjust the gain in the attitude mode first. The default value of 120 can be adopted (please set this parameter to 100 for the UAV whose blades are more than 30 inches). In the attitude mode, Don't move the bar, observe the self-stability ability of the UAV. A simple method is to hit the bar back slightly to see whether the UAV can return to horizontal place quickly. If not, increase the value by adding 5 each time.
vibration of the UAV to a certain extent. If the gain in the basic parameters can't restrain the shake of the UAV, try to set this parameter to 0. Generally, 3 or 4 can meet the flight requirements. This value can be increased steadily only after slight shaking occurs in the middle position when turning the angle back in the attitude mode. Increase 1 each time. The parameter should be no more than 10. ⑤ Y Damping: this coefficient is to increase the stability of the heading channel.
6.3.3 Debug of UAV Type figure 14 Debug UAV Type 6.3.
6.4 Task-setting Figure 16 Display of Flight Information The current status of UAV is displayed in the front of the operation interface. The button functions are: battery power, flight altitude, flight speed, distance from HOME point, GPS signal, flight time, flow rate, area that has been sprayed, dosage that has been used, and remote control signal strength. The lower left corner shows the current flight mode. 6.4.
the fight.When the Channel 6 switch is turned from point A to point B in GPS hovering mode, record the coordinates of point B. After the point B is recorded successfully, the LED will flash twice with purple light. When the recording is completed, toggle Channel 5 switch to AB mode, and then the roll channel gives a left / right full stroke action. At this time, the UAV starts to execute AB mode, and it will fly left / right continuously.
The operation is as follows: Extension of AB Point: when the UAV flies to the edge, move the pitch rocker (push or pull, push at the far end, pull at the near end), and the UAV will fly forward slowly at the speed of 2m / s. When it reaches the extended position, return the pitch rocker to zero, the UAV will stop, and then start to copy the corresponding route. Extension of point AB is completed.
2) Adjust the Height During the flight, if the UAV is in the middle position of the throttle, it will fly at a fixed height (with radar, it will follow the terrain to fly over the ground at a fixed height), the height will rise when the throttle is pushed up, and the height will fall when the throttle is pulled down. 3) Adjust the Direction During the flight, return the nose to the middle of the direction, the UAV will be locked for flight. If you push left in the direction, the nose will turn left.
6.4.1.4 Obstacle Avoidance in AB Mode 1) Avoid Obstacle Manually When the UAV is operating in AB mode, if it encounters obstacles in front, move the roll bar, the UAV will stop. Then move the roll bar horizontally to a safe value, you can operate the pitch bar. After bypassing obstacles and returning all the bars to the original position, the UAV will automatically return to AB mode and continue subsequent operation.
6.4.2 Independent Route-planning Mode 6.4.2.1 Plot Planning 4 planning methods, including mobile phone / remote control / UAV / RTK base station / map are available in EAvisionAgricultural System, among which remote control / UAV can use RTK high-precision dotting (if the UAV is configured with RTK). 1) Remote Control RTK Dotting: if the remote control is configured with RTK, you can access Qianxun SI or the cloud service of mobile base station to realize highprecision positioning.
Exit "Controller", enter "Mapping" page, tap the "Settings" button in the lower right corner, and then select "Controller" , the Qianxun SI RTK high-precision mapping is available.
After completing the mapping point, obstacle point (not necessary) and calibration point (not necessary), tap the "Upload" button to upload the plot to the server. 6.4.2.2 Flight Route Planning 1) Flight Route Parameters After planning the plot, edit it to generate a flight route. The flight route can also be edited. You can tap to set route mode, the safe distance between the surrounding routes and the plot, and the safe distance to avoid obstacles.
Select different sides (side 1 / side 2...), the planned route will be parallel to the selected edge (orange light on). A safe distance can be set in each side, and the safe distance can be set by tapping the increase and decrease buttons, or by entering numbers directly. Any vertex of the plot can be selected as the starting point of the route, and the "S" and "E" on the track mark the starting point and the ending point of the route.
2) Delete Waypoints In the actual operation process, there may be several routes in the middle of a plot that do not need to be operated. You can delete the routes that do not need to be operated by deleting the waypoints.
again or tap "Clear Help Point" to clear the help point. Figure 27 Set Help Point 6.4.2.3 Fly Autonomously After setting the flight height and uploading the flight route in the "Flight Monitoring" page, tap "Takeoff" - > "Work", the UAV will fly to waypoint 1 for operation.
operation. The flow rate can be set as fixed water pump output or automatic adjustment of flow rate per hectare. 7. Data Management 7.1 Data Downloading and Firmware Upgrading The storage device in the flight control system will record the flight data in real time, and one-time unlocking and locking constitute the starting and ending of a complete sortie. You can enter Settings > Log > Read Log to read the flight data of the latest sortie, and then upload it to the server.
8. Account Management Here is the detailed introduction to the management of enterprise operator account. Figure 28 Management Page of Enterprise Operator The content of account management of the enterprise operator includes: device management, team management, employee management, plot management, plot operation record, task management and orders. 8.
8.1.1 Activate Process A new UAV must be activated before the device can be bound to a specific account. The specific steps are: power on the UAV, connect to the APP, enter "Management" - > "Device Management", tap "Activate New Device", and the following page will display the flight control ID information of the UAV. Tap the UAV number and then tap "Confirm" in the confirmation page to activate the device. This step is completed in the manufacturer.
Tap any UAV in the list to view the details of the UAV. Figure 30 Basic Details 8.1.2 Lock and Unlock For the UAV under the account authority, tap the lock / unlock button in"Details" to lock or unlock the UAV remotely. Please note that if the UAV is locked, flight operation will be unavailable even if the UAV is powered on.
8.1.3 Transfer Tap "Transfer" in "Details", a transfer dialog box will pop up. Tap "Confirm" to scan the QR code of the transferee's account, and the UAV will be transferred to the transferee. Figure 32 Device Transfer 8.1.4 Flight Record Tap "Flight Record" in the list to enter flight record details page.
Tap in the figure to zoom in the track view; tap status in flight; and tap to replay the UAV to adjust the playback speed, which can be as fast as 8times. 8.2 Team Management In order to better manage the plant protection service team and optimize the data statistics, we have established the team management mode. Enter "Team Management" page, you can create your own team in "Eatablish a Team" at the bottom of the page, as shown in the figure.
In the figure, the role of the operator account in "商丘中原植保队1队" is administrator and team leader. The plot planned by team members can be seen by the whole team. Team leader can view the detailed operation information of anyone in the team The team leader can transfer his/her position to any member of the team at any time, or delete any member of the team. Other operators can join the team by scanning the team QR code.
Name:Name of the employee Account: Phone number of the employee Account Enablation: Turn on the button, input the phone number of the employee to get the verification code, and then input the verification code and login the APP. You can change the password in "Settings" in the upper right corner of "My Center". In Addition: the enterprise administrator account can directly modify the employee information on the platform, allowing the employee to login the APP by entering the account and password.
8.4 Plot Management Tap "Plot Management" to enter plot management page, as shown in the figure below: Figure 37 Main Page of Plot Management 1)New Plot: Tap "New Plot", select a team. After confirming the team, enter the mapping page and walk to the turning point of the plot boundary with the mapping device.
After determining the boundary points and boundary lines, tap and the icon will turn to . Then you can mark the obstacle. Move to the obstacle with the mapper, tap , the obstacle point will appear on the map, as shown in the following figure. After all the obstacle points are marked and all the boundary lines of the obstacle are confirmed, tap to confirm. Figure 39 Mapping the Obstacle Points Tap the icon again. When it turns to marked.
Figure 40 Mapping the Calibration Points Enter the plot in the list, such as "巴西". Enter the "Plot Detail" of "巴西", as shown in the figure below.
Modify: Modify the plot shape and add calibration points and obstacles. Delete: Delete plot information. Share: Share a plot to another account. Cut: Unavailable at the moment. 8.5 Work Detail Tap the "Work Detail" to enter the list of plot operation records. Select any plot to view the operation information of the plot, as shown in the following figure.
8.6 Task Management Tap to enter "Task Management" page, and then tap "Create a New Task" to create a new task, as shown in the following figure.
After creating a new task, tap the created task in the list to view the task details, as shown in the following figure.
9. Offline Operation Procedure 9.1 Connect to the Remote Control Enter the EAvisionAgriculture APP first, then tap "Settings", select the device whose number starts with "300" (remote control), tap "Connect", then your phone will be connected to the remote control. 9.2 Mapping Enter EAvisionAgriculture APP, search for the base station. Find the base station which the device name starts with "HC", tap "Connect" to connect your phone to it. After it is connected, choose "Enter Location Mode".
10. Maintenance Instructions In order to ensure flight safety and keep the UAV in the best status, users should regularly maintain the plant protection UAV. 10.1 Content and Cycle of Maintenance ⚫ Every 5~10 Sorties Check whether the strainer and pipe are blocked. If there are, please clean the strainer and the pipe. Check whether the screws of the propellers are loose. Check whether the arm sleeves are loose. ⚫ Every day Clean the chemical tank, spray nozzles and all the pipes.
⚫ Main Battery: Replace it when the charge and discharge cycles exceed 560 or the battery has been used for 12 months. ⚫ Water Pump: Replace it when the total operating area reaches 120 Ha. ⚫ Pressure Spray Nozzle: Replace it when the total operating area reaches 120 Ha. ⚫ Motor: Replace it when the total flight time reaches 200 hours. 10.3 Battery Maintenance and Cautions Maintenance: ⚫ The battery has the function of self-maintenance.
⚫ Don't use any unofficial charger for charging. ⚫ Don't use or store the battery near fire, heat source, inflammable, explosive, corrosive and other articles. ⚫ For long-term storage, please fully charge the battery and charge it every 3 months to maintain the stability of the battery. ⚫ Before installing or unplugging the battery from the UAV, please make sure the power is off. ⚫ Please make sure the battery is turned off before charging.
11. Warranty Services 11.1 Application Range of Warranty Services 1. Products with free warranty service must meet the following conditions: ⚫ Function well within the specified product warranty period; ⚫ Product performance failure and other quality reasons; ⚫ The UAV code, factory label and other marks are consistent with the information in the order confirmation sheet, and there is no sign of tear or alteration; ⚫ Provide legal and valid purchase certificate (contract or invoice) and warranty card. 2.
operators beyond normal use conditions; ⚫ Users or operators modify or add equipment that does not meet the requirements of official instructions and guidance; ⚫ Any manmade reason or external force reason that is not Party A's responsibility; ⚫ Direct or indirect fault or loss caused by flight under unseaworthy conditions (such as equipment alarm, bad weather, etc.
11.2 Part List of Warranty Services No.
Before printing, the technical data and instructions in this manual have been checked as necessary. However, in order to continuously develop and improve this product and this manual to meet the needs of customers, we reserve the right to make changes if necessary without notice. Thank you for using our products. EAvisionOfficial Wechat Account Published by Suzhou EAVision Robotic Technologies Co., Ltd Suzhou EAVision Robotic Technologies Co., td All rights reserved. Version:202101V1.