
User's Manual


50
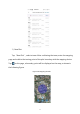
After determining all the boundary points and boundary lines, tap , and the
icon will turn to . Then you can mark the obstacle. Move to the obstacle with
the mapper, tap , the obstacle point will appear on the map, as shown in the
following figure. After all the obstacle points are marked and all the boundary lines
of the obstacle are confirmed, tap to confirm.
Figure 39 Mapping the Obstacle Points
Tap the icon again. When it turns to , the calibration point can be
marked. For example, in Figure 40,
is the calibration point. If the plot has
been edited, tap the icon at the bottom of the map, enter the “Plot
Name”, and then tap “Confirm”, the plot information is in the “Plot List”.