
User's Manual


SurveyMonkey User Manual
Page 53
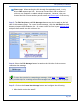
2. Customize the message, enter the Reply address, and click the Save and
Preview button. (If you have already created a message in the past, then you
can copy the body of a previous message from the dropdown menu above the
body text. This menu stores up to 25 of the most recent messages created.)
3. Click the Schedule Delivery button to configure a delivery date and time or
choose the option send the message immediately.
Features of the Email Invitation Collector:
Any time you want to access the list of emails that has received a survey or
if you want to send a new message or reminder, simply click the Collect
icon next to that survey. Then click on the collector title that has been
created.
The Message Manager for an Email Invitation collector enables you to do the
following:
Track your respondents: The Edit Recipients section shows the status of the
emails. Here you can check how many Responded, Unresponded, or Opt Outs
you currently have. It also shows the number of emails that are Unsent/New.
Click on the View button to look at the email list for that Collector.
Search for specific email addresses: You can search for a specific email
addresses in a list. Display the entire list or select to view only those of a
certain status (e.g. All Unsent/New, Responded, etc.)
Add/Remove/Download emails: In the Edit Recipients section, you can add
emails to the list, remove emails from the list, or download/export your list.
Manually add responses: To manually add responses for survey participants,
you can enter a response in the Email List section on their behalf.
Check the "send " status: The Email Message section allows you to check the
"send" status your email delivery, or cancel the message within 5 minutes of
scheduling the "immediate" delivery.
Manage Messages: The Email Message section shows you the "Total Messages"
and the number messages in the "draft" status. Here you can check the number
of "scheduled" or "in progress" messages.