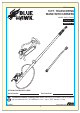
ITEM #0434982 18 FT. TELESCOPING WAND WITH HARNESS MODEL #SGY-PWA65 Français p. 10 Español p. 19 DANGER POINT IT DO NOT HUMAN BODY SEVERE INJURY MAY RESULT TR IG GE LO R CK ATTACH YOUR RECEIPT HERE Serial Number Purchase Date Questions, problems, missing parts? Before returning to your retailer, call our customer service department at 1-877-888-8225, 8 a.m. - 8 p.m., EST, Monday - Friday. AB15691 www.lowes.
TABLE OF CONTENTS Safety Information..................................................................................................................... 3 Preparation .............................................................................................................................. 4 Installation Instructions ............................................................................................................ 4 Operating Instructions .......................................................
SAFETY INFORMATION WARNING Beware of overhead power lines. Contacting these lines with the long wand may result in electrocution, injury, or even death. Always shut down pressure washer/water supply and depressurize before removing or cleaning accessories. Wear safety glasses when operating unit. Never point spray nozzles or guns at humans or animals. Never place any body part in the water stream. Serious injury can result from the high pressure discharge produced by pressure washers.
PREPARATION Before beginning assembly, installation or operation of product, make sure all parts are present. Compare parts with package contents list. If any part is missing or damaged, do not attempt to assemble, install or operate the product. • Estimated Assembly Time: 10 minutes • Tools Required for Assembly: 1 in. Adjustable Wrench and pipe thread tape (not included) INSTALLATION INSTRUCTIONS 1.
INSTALLATION INSTRUCTIONS Choose one: Step 3 or Step 4. 3 3. GUN & QUICK DISCONNECT HOSE CONNECTION A Attach hose (not included) to the telescoping wand (A). DAN GE DO NOT R HUM POINT AN IT SEVE BODY RE INJUR MAY RESU Y LT GER TRIG K LOC Quick disconnect plug Socket collar 4. GUN & METRIC HOSE CONNECTION 4 DANGER POINT IT A Attach the adapter (C) to the telescoping wand (A). Attach hose (not included) to the adapter (C).
OPERATING INSTRUCTIONS 6a Choose step 6 for right handed operators. Choose step 7 for left handed operators. 6. HOW TO WEAR HARNESS FOR RIGHT HANDED OPERATORS Place padded shoulder strap on your left shoulder. Wrap waist belt around waist and fasten buckle. Buckle should rest against the right side of your torso as you look down. 6b Adjust shoulder strap to position waist belt at desired height. 6c NOTE: It is recommended that the harness be located between your waist and chest.
OPERATING INSTRUCTIONS 7. HOW TO WEAR HARNESS FOR LEFT HANDED OPERATORS 7a Place padded shoulder strap on your right shoulder. Note: Shoulder pad can be rotated on strap for left handed operators. Wrap waist belt around waist and fasten buckle. Buckle should rest against the right side of your torso as you look down. 7b Adjust shoulder strap to position waist belt at desired height. NOTE: It is recommended that the harness be located between your waist and chest.
CARE AND MAINTENANCE To promote longer life of accessories, run clean, fresh water through them and then turn off pressure washer and water supply. Depressurize by squeezing the gun trigger until all of the water has been drained out of the unit. Accessories can now be disconnected safely for storage in a cool, dark area. If debris exists after connection, clean before storing. TROUBLESHOOTING PROBLEM POSSIBLE CAUSE CORRECTIVE ACTION Connections leak 1. Loose connections 2. Sealant worn 3.
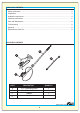
REPLACEMENT PARTS LIST 1 2 C 4 DA TRIGGER LOCK DO NG NO HU T ER MA PO INT SE N VE BO MA RE DY IT Y RE INJ SU URY LT 5 6 7 B 3 B D PART DESCRIPTION QUANTITY 1 2 Foam Guard Lock 1 1 3 4 Lock Fitting Tube to Lance 1 1 5 6 Swivel Coller 1 7 Swivel Inner Fitting O-ring 1 1 B 20 in. Extension Wand C D Adapter Harness 1 1 1 Printed in China BLUE HAWK is a registered trademark of L. F., LLC. All Rights Reserved. www.lowes.
ARTICLE #0434982 LANCE TÉLESCOPIQUE DE 5,49 M AVEC HARNAIS MODÈLE #SGY-PWA65 DANGER POINT IT DO NOT HUMAN BODY SEVERE INJURY MAY RESULT TR IG GE LO R CK JOIGNEZ VOTRE REÇU ICI Numéro de série Date d’achat Des questions, des problèmes, des pièces manquantes?Avant de retourner l’article au détaillant, appelez notre service à la clientèle au 1 877 888-8225, entre 8 h et 20 h (HNE), du lundi au vendredi. www.lowes.
TABLE DES MATIÈRES 12 Consignes de sécurité .............................................................................................................. . Préparation ............................................................................................................................... 13 Instructions pour l’installation ................................................................................................... 13 Mode d’emploi ..............................................................
CONSIGNES DE SÉCURITÉ AVERTISSEMENT Prenez garde aux lignes électriques aériennes. Tout contact de la lance avec ces lignes peut entraîner une décharge électrique, des blessures et même la mort. Assurez-vous de toujours arrêter la laveuse à pression ou de couper l’alimentation en eau et d’évacuer la pression avant de retirer ou de nettoyer les accessoires. Portez des lunettes de sécurité lorsque vous utilisez l’article. N’orientez jamais une buse ou un pistolet en direction d’une personne ou d’un animal.
PRÉPARATION Avant de commencer à assembler, à installer ou à utiliser le produit, assurez-vous d’avoir toutes les pièces. Comparez le contenu de l’emballage avec la liste des pièces. S’il y a des pièces manquantes ou endommagées, ne tentez pas d’assembler, d’installer ni d’utiliser l’article. • Temps d’assemblage approximatif : 10 minutes. • Outils nécessaires pour l’assemblage : clé à molette de 1 po et ruban d’étanchéité pour filetage (non inclus). INSTRUCTIONS POUR L’INSTALLATION 1.
INSTRUCTIONS POUR L’INSTALLATION Choisissez entre l’étape 3 et l’étape 4. 3. RACCORD DU PISTOLET ET D’UN TUYAU À DÉCONNEXION RAPIDE Fixez le tuyau (non inclus) à la lance télescopique (A). 3 A DAN GE DO NOT R HUM POINT AN IT SEVE BODY RE INJUR MAY RESU Y LT GER TRIG K LOC Embout à déconnexion rapide Bague de douille 4. RACCORD DU PISTOLET ET D’UN TUYAU MÉTRIQUE Fixez l’adaptateur (C) à la lance télescopique (A). Fixez le tuyau (non inclus) à l’adaptateur (C).
MODE D’EMPLOI Pour une utilisation par un droitier, passez à l’étape 6. Pour une utilisation par un gaucher, passez à l’étape 7. 6a 6. PORT DU HARNAIS POUR UN UTILISATEUR DROITIER Placez la bandoulière rembourrée sur votre épaule gauche. Mettez la ceinture autour de votre taille et fermez la boucle. Celle-ci devrait être posée contre le côté droit de votre torse lorsque vous regardez vers le bas. 6b Réglez la bandoulière afin de placer la ceinture à la hauteur désirée.
MODE D’EMPLOI 7. PORT DU HARNAIS POUR UN UTILISATEUR GAUCHER 7a Placez la bandoulière rembourrée sur votre épaule droite. Remarque: Le coussinet peut être tourné sur la bandoulière pour les utilisateurs gauchers. Mettez la ceinture autour de votre taille et fermez la boucle. Celle-ci devrait être posée contre le côté droit de votre torse lorsque vous regardez vers le bas. 7b Réglez la bandoulière afin de placer la ceinture à la hauteur désirée.
ENTRETIEN Pour prolonger la durée de vie des accessoires, rincez-les à l’aide d’eau propre et fraîche, puis arrêtez la laveuse à pression et coupez l’alimentation en eau. Évacuez la pression en enfonçant la gâchette du pistolet jusqu’à ce que toute l’eau se soit écoulée. Vous pouvez maintenant déconnecter les accessoires en toute sécurité et les ranger dans un endroit frais et sombre. S’il reste des débris après le raccord, nettoyez l’article avant de le ranger.
LISTE DES PIÈCES DE RECHANGE 1 2 C 4 DA TRIGGER LOCK DO NG NO HU T ER MA PO SE N INT VE BO MA RE DY IT Y RE INJ SU URY LT 5 6 7 B 3 B D PIÈCE DESCRIPTION QUANTITÉ 1 2 Protecteur en mousse Verrou 1 1 3 Verrou Tube de raccord pour lance Collier pivotant Raccord intérieur pivotant 1 Joint torique 1 4 5 6 7 C Rallonge de lance de 51,70 cm Adaptateur D Harnais B 1 1 1 1 1 1 Imprimé en Chine BLUE HAWK est une marque de commerce déposée de L.F., LLC. Tous droits réservés. www.lowes.
ARTÍCULO #0434982 VARA TELESCÓPICA CON ARNÉS DE 5,49 M MODELO #SGY-PWA65 DANGER POINT IT DO NOT HUMAN BODY SEVERE INJURY MAY RESULT TR IG GE LO R CK ADJUNTE SU RECIBO AQUÍ Número de serie Fecha de compra ¿Preguntas, problemas, piezas faltantes? Antes de volver a la tienda, llame a nuestro Departamento de Servicio al Cliente al 1-877-888-8225, de lunes a viernes de 8 a.m. a 8 p.m., hora estándar del Este. www.lowes.
ÍNDICE Información de seguridad ......................................................................................................... 21 Preparación .............................................................................................................................. 22 Instrucciones de instalación ..................................................................................................... 22 Instrucciones de funcionamiento ...............................................................
INFORMACIÓN DE SEGURIDAD ADVERTENCIA Tenga cuidado con las líneas eléctricas superiores. Si la vara larga entra en contacto con estas líneas se podría provocar una electrocución, lesiones o incluso la muerte. Siempre apague el equipo de lavado con agua a presión, corte el suministro de agua y despresurice antes de retirar o limpiar los accesorios. Use gafas de seguridad cuando opere la unidad. Nunca apunte las boquillas de rociado ni las pistolas a personas o animales.
PREPARACIÓN Antes de comenzar a ensamblar, instalar o usar el producto, asegúrese de tener todas las piezas. Compare las piezas con la lista del contenido del paquete. No intente ensamblar, instalar ni usar el producto si falta alguna pieza o si estas están dañadas. • Tiempo estimado de ensamblaje: 10 minutos • Herramientas necesarias para el ensamblaje: Llave ajustable y de 1 pulg y cinta para roscas de tubería (no se incluye) INSTRUCCIONES DE INSTALACIÓN 1 1.
INSTRUCCIONES DE INSTALACIÓN Escoja uno: Paso 3 o Paso 4. 3. CONEXIÓN DE LA PISTOLA Y LA MANGUERA DE DESCONEXIÓN RÁPIDA Fije la manguera (no se incluye) a la vara telescópica (A). 3 A DAN GE DO NOT R HUM POINT AN IT SEVE BODY RE INJUR MAY RESU Y LT GER TRIG K LOC Tapón de desconexión rápida Anillo del socket 4. CONEXIÓN DE LA PISTOLA Y LA MANGUERA MÉTRICA Fije el adaptador (C) a la vara telescópica (A). Fije la manguera (no incluida) al adaptador (C).
INSTRUCCIONES DE FUNCIONAMIENTO 6a Escoja el paso 6 para usuarios diestros. Escoja el paso 7 para usuarios zurdos. 6. CÓMO USAR UN ARNÉS PARA USUARIOS DIESTROS. Coloque la correa acolchada sobre su hombro izquierdo. Coloque el cinturón alrededor de la cintura y ajuste la hebilla. La hebilla debe quedar contra el lado derecho del torso, mirado desde arriba hacia abajo. 6b Ajuste la correa para dejar el cinturón a la altura deseada. NOTA: Se recomienda que coloque el arnés entre la cintura y el pecho.
INSTRUCCIONES DE FUNCIONAMIENTO 7. CÓMO USAR UN ARNÉS PARA USUARIOS ZURDOS. 7a Coloque la correa acolchada sobre su hombro derecho. Nota: Los operadores zurdos pueden dar vuel ta el acolchado para el hombro de la correa. Coloque el cinturón alrededor de la cintura y ajuste la hebilla. La hebilla debe quedar contra el lado derecho del torso, mirado desde arriba hacia abajo. 7b Ajuste la correa para dejar el cinturón a la alt ura deseada.
CUIDADO Y MANTENIMIENTO Para aumentar la vida útil de los accesorios, haga circular agua limpia y fresca por ellos, apague el equipo de lavado con agua a presión y corte el suministro de agua. Despresurice la unidad apretando el gatillo de la pistola hasta que se haya drenado toda el agua. Ahora puede desconectar los accesorios de forma segura para almacenarlos en un área seca y oscura. Si aún hay presencia de desechos después de la conectar la unidad, límpiela antes de almacenarla.
LISTA DE PIEZAS DE REPUESTO 1 2 C 4 DA TRIGGER LOCK DO NG NO HU T ER MA PO SE N INT VE BO MA RE DY IT Y RE INJ SU URY LT 5 6 7 B 3 B D PIEZA DESCRIPCIÓN CANTIDAD 1 2 Protector de espuma Bloqueo 1 1 3 Bloqueo 1 4 1 5 Tubo del conector para lanceta Anillo giratorio 6 Conector interno giratorio 1 7 Junta tórica 1 B 1 C Vara de extensión de 51,70 cm Adaptador D Arnés 1 1 1 Impreso en China BLUE HAWK es una marca registrada de L. F., LLC. Todos los derechos reservados www.