
Installation Guide

3
5. FOR A SHOWER OR BATHTUB INSTALLATION
5.1 Apply silicone sealant around the perimeter of each tile (before installing the next), to keep water from entering.
Do not put silicone on the surface of the tile.
5.2 Remove excess silicone with your finger.
6. TO COMPLETE INSTALLATION
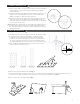
6.1 Follow the same steps to install the next tile, according to the installation configuration you have decided on. (Fig. 4)
6.2 When you reach the edge of the wall, measure the distance between the last tile installed and the wall. Mark the cut to
make on the final tile. (Fig. 5)
6.3 To cut the tile, trace a line. Place a carpentry square or a metal ruler on the line and then run the utility knife gently
along it three or so times.
6.4 Break the tile by pressing from the center toward the edges. Finish cutting the foam backing with the knife.
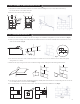
6.5 To cut holes for electrical outlets and plumbing fixtures, carefully measure and mark the corresponding cut-outs on the tile.
Use the utility knife to cut where indicated. (Fig. 6)
6.6 For a perfect finish, use end trims in the corners. These can be found in any hardware store. (Fig. 7)
Fig. 5
Fig. 4
Fig. 6 Fig. 7