
Installation Guide
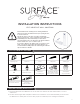

40 x 80 cm
(15,75 x 31,5”)
30.5 x 61 cm
(12 x 24”)
18.5 x 91.5 cm
(7,75 x 36”)
2
3. SURFACE PREPARATION
3.1 Make sure the surface is clean and free of dust or any other substances
that can detach once the wall covering is installed (e.g. wallpaper,
peeling paint, etc.).
3.2 Surface Design tiles install directly on many surfaces. However, if your
wall is porous (concrete, plaster, wood, etc.), we recommend first
applying a sealant or a primer for better adhesion.
3.3 Fill any holes, remove nails and screws, and level bumps on the wall’s
surface to remove any irregularities that could misalign the tiles or
aect their adhesion. If necessary, repair any unevenness of the surface
to ensure there are no slopes.
IMPORTANT: The self-adhesive tiles are flexible, but could detach from
the wall or break if they are subject to constant, significant bending.
The construction adhesive needs to be in direct contact with a smooth,
solid and stable wall.
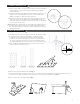
4. WALL INSTALLATION
4.1 Carefully measure each of the walls on which the tiles will be installed.
4.2 Using the spirit level, draw a horizontal line on each of the walls,
to mark the center of the wall. Then draw a vertical line through
this line on each wall. In drawing a cross shape, you will obtain four
90° angles, which will act as reference points for installing the first
tile. Start installing the tiles from the center of the cross on each wall.
4.3 Place a sucient quantity of adhesive in each opening to ensure a
surface contact of at least 2 cm
2
(¾’’).
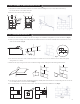
4.4 Remove the protective film from the tile. (Fig. 1)
4.5 Position the first tile in one of the corners of the cross shape drawn on the middle of the wall. Apply light pressure on
the tile from the edges toward the center for a few seconds to ensure proper adhesion. (Fig. 2)
4.6 Make sure the tile is level and straight. (Fig. 3)
Fig. 1 Fig. 2 Fig. 3