EP-9001-g 54M WLAN USB Adapter User Manual
4819428GZ000 1.Introduction--------------------------------------------------------------------------------------------------------3 1.1Feature-------------------------------------------------------------------------------------------------------------3 1.2Specification------------------------------------------------------------------------------------------------------4 1.3Package Contents---------------------------------------------------------------------------------------------- 4 1.
1 Introduction The 802.11g WLAN USB Adapter provides greater performance than ever before. Incorporated with latest IEEE 802.11g technology, the WLAN USB Adapter is not only compliant with other 802.11g products but allows you to connect with other 802.11b devices. With WPA (Wi-Fi Protected Access) and 64/128-bit WEP encryption, the WLAN USB Adapter ensure the security of your network communication. All you need is laptop computer with one USB1.1/ USB 2.
1.2 Specification Model:802.11g WLAN USB Adapter Radio:Complies with IEEE 802.11b/g Frequency Band:2.412-2.462GHz(U.S.) 2.412-2.484GHz(Japan)2.412-2.472GHz(ETSI) Modulation TYPE :BPSK,QPSK,CCK,16-QAM,64-QAM Operating Channels:11 channels (US)13 channels (ETSI)14 channels (Japan) Data Rate:1 / 2 / 5.5 / 6/9/11/12/24/36/48/54Mbps Output Power: 18dBm@11Mbps;15dBm@54Mbps Receive sensitivity: Min.-80dBm for 11Mbps (@BER 8%) Min.
1.4 Systems Requirements 1.One USB 1.1/ USB 2.0 slot. 2.A laptop computer with an available USB1.1 / USB 2.0 slot. 3.Operating System: Windows 98SE/2000/ME/XP 4.60M bytes free disk space for utility and driver installation. Note : If you insert the 802.11g WLAN USB Adapter before installing the driver and utility, the operating system will detect a new device and start to configure the new device. Click Cancel to finish the wizard. Follow the instruction step by step to install the WLAN USB Adapter. 2.
2.2 Removing the WLAN USB Adapter If you want to remove the WLAN USB Adapter, you can direct remove the WLAN USB Adapter out of the slot.
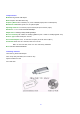
3.Software Installation 3.1Installing WLAN USB Adapter Utility and Driver Insert the setup CD into your CD-ROM Device. Then, the Install ShieldWizard should launch automatically, if it does not launch automatically, Double-click setup.exe in your CD-ROM Drive.
Click Next button in the following window. The InstallShield Wizard is copying the necessary files to the system.
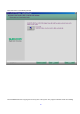
status. Plug-in the WLAN USB Adapter into your USB slot when the window below appears. If this is the first time you install the software, the window below will appear.
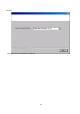
click Next. Click Finish ,when the installation is completed.
After completing the installation, the icon will appear in the system tray. Double-click the icon to configure the WLAN USB Adapter. 3.2 Uninstalling the Driver and Utility You may follow the instruction step by step to uninstall the WLAN USB Adapter completely. Insert the setup CD or execute the setup.exe again.
The following window should launch automatically. Select Remove, and click Next.
Select OK to continue uninstallation.
Click OK to finish, when the uninstallation is completed. 4.
After the Configuration Utility has been installed, an icon will placed in the system tray when the WLAN USB Adapter is inserted. Click the icon and the configuration utility will pop up. The utility was six tabs: Profile, Link Status, Site Survey, Statistics Advance, and About. You should change all your configuration settings for your WLAN USB Adapter using this utility. 4.
Specific different network profile settings used in various locations, such as your office, your home, the factory, or the airport. In each profile, you can specify a network type, network name, WEP and security setting parameters required for that operating location. 4.1.1.1 System Configuration Edit profile Network Type: The column in Profile list from left to right is “Profile”、”SSID”、”Channel”、”Authentication”、”Encryption”and “Network Type” .Click ACTIVATE to excuse the profile.
SSID: All wireless devices within the ESS or extended wireless LAN use the SSID. This can be any alphanumeric value of up to 32 characters long. Use this to prevent cross communication between two or more WLAN in one area. The SSID should be changed in order to provide some minimum security. Channel: Shows the selected channel that is currently used. (Available channels depends on the country or region you are located.
4.1.1.2 Edit Profile To add a new location profile name or to rename, delete, or select an existing profile, click Edit. The Edit Configurations screen appears as follows Power Save Mode: CAM: (Constant Awake Mode) CAM is the normal mode for desktop machines or other machines where power consumption is not an issue. It keeps the radio powered up continuously, so there is little latency for responding to messages. Max_PSP: Maximum Power Save. Fast_PSP: Fast Awake.
performance. RTS Threshold: The RTS Threshold sets an upper threshold at which point the device will issue an RTS packet. The RTS (Request To Send) packet is used for the purpose of avoiding data collisions on the wireless LAN. There are several trade offs to consider when setting this parameter. Setting this parameter to a small value causes RTS packets to be sent more often, consuming more of the available bandwidth, therefore reducing the apparent throughput of other network packets.
4.1.1.3 Authentication & Security Authentication Type: Defines authentication type of the wireless networks, including "Open System" and “Share Key” authentication. The wireless adapter will need to be set to the same authentication type to communicate. Open System: With this setting any station in the Wireless LAN can associate with an Access Point to receive and to transmit data. Share Key: Is when both the sender and recipient share a secret key.
WEP Key: Key 1 - Key 4: These four fields can be used to manually enter the encryption keys. This may be necessary if you wish this node to match keys in a different vendor's product. WEP Key length: The 64 or 128-bits Wired Equivalent Privacy Algorithm. You can decide the network key to be encoded by ASCII characters or hexadecimal digitals. A key of 10 hexadecimal characters (0-9, A-F) is required if a 64-bit Key Length was selected.
4.1.3 Site Survey: Click the Site Survey; you can to see the signal strength, channel, Encryption, authentication and network type of available wireless network. The AP MAC address will also be displayed at the Preferred BSSID field. Select the AP you want to connect to and click connect to establish network.
4.1.
4.1.5 Advance: Wireless Mode If there are 802.11b devices in your wireless network, choose b+g mixed mode. If all the devices in your wireless network are 802.11g ones, choose 802.11g mode to get better transfer rate. Tx Burst Enable this function to burst the transmit speed, but it may affect signal quality. Radio off You can stop wireless transmission by clicking this icon. Click again to resume wireless connection.
4.1.6 About This screen shows copyright, Utility / Driver version and MAC Address of this wireless LAN Card.
5. Glossary Ad-Hoc Mode An Ad-hoc integrated wireless LAN is a group of computers, each has a Wireless LAN adapter, Connected as an independent wireless LAN. Ad hoc wireless LAN is applicable at a departmental scale for a branch or SOHO operation. BSS ID A specific Ad hoc LAN is called a Basic Service Set (BSS). Computers in a BSS must be configured with the same BSS ID.
The IEEE 802.11b/g Wireless LAN standards subcommittee formulating standards for the industry. The objective is to enable wireless LAN hardware from different manufacturers to communicate. Infrastructure Mode A client setting providing connectivity to an Access Point. As compared to Ad-Hoc Mode where PCs communicate directly with each other clients set in Infrastructure Mode all pass data through a central Access Point.
FCC Statement This device complies with FCC Rules Part 15. Operation is subject to the following two conditions: 1. This device may not cause harmful interference, and 2. This device must accept any interference received, including interference that may cause undesired operation. This equipment has been tested and found to comply with the limits for a Class B digital device, pursuant to Part 15 of the FCC Rules.
2-Year Limited Warranty Subject to the terms and conditions set forth herein, SURECOM provides this Limited warranty for its product only to the person or entity that originally purchased the product from SURECOM or its authorized reseller or distributor.