
User Guide
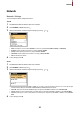

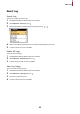
Table Of Contents

Network
21
Network
Network Settings
You can change the network settings of the device.
TCP/IP
1 Press ESC and authenticate with the Admin level credential.
2 Select NETWORK > TCP/IP, then press .
3 Select the desired item and then change the settings by pressing or .
• Port: Set the device port.
• DHCP: Set whether or not to use DHCP. If Disabled is set, the user can modify Port, IP Address, Gateway, or Subnet Mask.
• IP Address: View the IP address of the device. To modify, set DHCP to Disabled.
• Gateway: View the gateway of the device. To modify, set DHCP to Disabled.
• Subnet Mask: View the subnet mask of the device. To modify, set DHCP to Disabled.
• DNS: Set the DNS server address.
4 To save settings, press OK.
Server
1 Press ESC and authenticate with the Admin level credential.
2 Select NETWORK > Server, then press .
3 Select the desired item and then change the settings by pressing or .
• Connection Mode: When you select Device -> Server, you can send a connection signal from the device to a server with the input
information directly. When you select Server -> Device, Server IP and Server Port cannot be entered.
• Server URL: Enter server URL instead of Server IP. Input is accepted only when Device -> Server is set for Connection Mode.
• Server IP: Enter the IP of the PC where BioStar 2 is installed. Input is accepted only when Device -> Server is set for Connection Mode.
• Server Port: Enter the port of the PC where BioStar 2 is installed. Input is accepted only when Device -> Server is set for Connection
Mode.
4 To save settings, press OK.