
User Manual


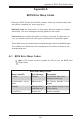


Table Of Contents
- Preface
- Chapter 1 Introduction
- Chapter 2 Installation
- 2-1 Standardized Warning Statements
- 2-2 Static-Sensitive Devices
- 2-3 Motherboard Installation
- 2-4 Memory Support
- 2-5 Connectors/IO Ports
- 2-6 Connecting Cables
- ATX PWR, DC PWR and HDD PWR Connectors (JPW1, PJ1, J6)
- Fan Headers (FAN1 ~ FAN4) (FAN4 is available on PCB 2.00 only)
- Chassis Intrusion
- System Management Bus Header
- DOM PWR Connector
- TPM Header/Port 80 Header
- Overheat LED Header
- Speaker
- Standby Power
- I-SGPIO1/I-SGPIO2
- NVMe I2C Header
- Power SMBus (I2C) Connector (available on PCB 2.00 only)
- System Management Bus Header
- GPIO Header
- ATX PWR, DC PWR and HDD PWR Connectors (JPW1, PJ1, J6)
- 2-7 Jumper Settings
- 2-8 Onboard Indicators
- 2-9 SATA Connections
- Chapter 3 Troubleshooting
- Chapter 4 BIOS
- Appendix A BIOS Error Beep Codes
- Appendix B Software Installation Instructions
- Appendix C UEFI BIOS Recovery Instructions
- Appendix D Dual Boot Block

Appendix B: Software Installation Instructions
B-1
Note 1: Click the icons showing a hand writing on paper to view the readme
les for each item. Click the computer icons to the right of these items to
install each item (from top to the bottom) one at a time. After installing
each item, you must reboot the system before moving on to the next
item on the list. The bottom icon with a CD on it allows you to view the
entire contents.
Note 2: When making a storage driver diskette by booting into a Driver
CD, please set the SATA Conguration to "Compatible Mode" and congure
SATA as IDE in the BIOS Setup. After making the driver diskette, be sure
to change the SATA settings back to your original settings.
Appendix B
Software Installation Instructions
B-1 Installing Software Programs
The Supermicro ftp site contains drivers and utilities for your system at ftp://ftp.
supermicro.com. Some of these must be installed, such as the chipset driver.
After accessing the ftp site, go into the CDR_Images directory and locate the ISO
le for your motherboard. Download this le to create a CD/DVD of the drivers and
utilities it contains. (You may also use a utility to extract the ISO le if preferred.)
Another option is to go to the Supermicro website at http://www.supermicro.com/
products/. Find the product page for your motherboard here, where you may down-
load individual drivers and utilities.
After creating a CD/DVD with the ISO les, insert the disk into the CD/DVD drive
on your system and the display shown below should appear.
Driver/Tool Installation Display Screen