
User`s manual


X9SCV-Q User's Manual
C-2
Note: At this point, you may decide if you want to start with BIOS Recov-
ery. If you decide to proceed with BIOS Recovery, follow the procedures
below.
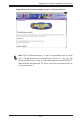
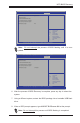
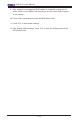
When the screen as shown above displays, use the arrow key to select the 5.
item "Proceed with ash update" and press the <Enter> key. You will see the
progress of BIOS Recovery as shown on the following screen.
a USB CD/DVD ROM/RW device can be used for this purpose. However, a USB
Hard Disk drive cannot be used for BIOS recovery at this time.
To perform UEFI BIOS recovery using a USB-attached device, follow the instruc-
tions below.
Using a different machine, copy the "Super.ROM" binary image le into the 1.
disc Root "\" Directory of a USB device or a writeable CD/DVD.
Note: If you cannot locate the "Super.ROM" le in your driver disk, visit our
website at www.supermicro.com to download the BIOS image into a USB
ash device and rename it to "Super.ROM" for BIOS recovery use.
Insert the USB device that contains the new BIOS image ("Super.Rom") into 2.
your USB drive and power on the system
While powering on the system, keep pressing <Ctrl> and <Home> simultane-3.
ously on your PS2 or USB keyboard until your hear two short beeps. This
may take from a few seconds to one minute.
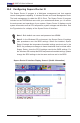
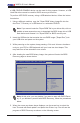
After locating the new BIOS binary image, the system will enter the BIOS 4.
Recovery page as shown below.
Aptio Setup Utility - Copyright (C) 2011 American Megatrends, Inc.
Main Advanced Event Logs IPMI Boot Security Exit
: Select Screen
: Select Item
Enter: Select
+/- : Change Opt.
F1 : General Help
F2 : Previous Values
F3 : Optimized Defaults
F4 : Save & Exit
ESC : Exit
Version 2.12.1211. Copyright (C) 2011 American Megatrends, Inc.
WARNING! BIOS Recovery Mode has been detected
Set this to start ash
update
Recovery
Flash Update P a rameters
Reset NVRAM
[Enabled]
Pr oceed with Flash Update