
User`s guide


6-13
Chapter6:Conguration
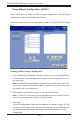
ReviewthecongurationshownintheVirtualDiskSummarywindow.Ifyou10.
wanttochangesomething,clickBackandchangethecongurationparam-
eters.
ClickFinishtoacceptthecongurationandstarttheinitializationprocess(un-11.
less you selected No Initialization earlier).
UsingManualConguration:RAID10
Follow these steps to create a RAID 10 storage conguration using the Manual
CongurationmodeoftheCongurationWizard:
Creating a RAID 10 Storage Conguration Mode
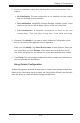
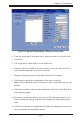
IntherstManualCongurationwindow,showninFigure6-5,selecttwo1.
available drives in the left panel. Click the Right Arrow button to move the
selected drives to the right panel.
Click Accept to accept these drives for a new RAID 1 array.2.
Select two more drives for a second RAID 1 array, and click Accept.3.
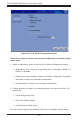
To add a hotspare, select an available drive in the left panel. Select the array 4.
from the drop-down menu, and click Add Hotspare To, as shown in Figure
6-7.
To remove a hotspare from an array, select it in the right panel and click 5.
Remove HotSpare.
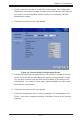
Click Next. 6.
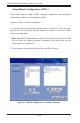
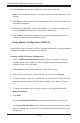
ThenextCongurationWizardwindowappears,asshowninFigure6-6..
The Arrays with Free Spacemenuliststhenewarraysthatyoujustdened,
plus any existing arrays with holes (free space) that could be used for a new
conguration.
In the left panel, select the two RAID 1 arrays from the menu.7.
In the right panel, select RAID 10 as the RAID level.. 8.
For a RAID 10 array, the entire capacity of the array is automatically used for
thenewvirtualdisk.Youcannotdeneanothervirtualdiskonthisarray.
(Optional) Change the other Virtual Disk Properties, if necessary. For more 9.
information, see Section , “Understanding Virtual Disk Parameters.”