
User`s guide


6-11
Chapter6:Conguration
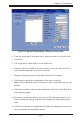
4. To remove a hotspare from an array, select it in the right panel and click Remove
HotSpare.
5. Click Next.
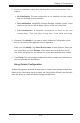
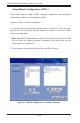
ThenextCongurationWizardwindowappears,asshowninFigure6-6.
TheArrayswithFreeSpacemenuslistthenewarray(s)thatyoujustdened,plus
anyexistingarrayswithholes(freespace)thatcouldbeusedforanewcongura-
tion.
6. Select the array to use for the new virtual disk.
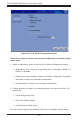
7. In the right panel, select RAID 1 as the RAID level.
8. (Optional) Set Size (in MB) to a lower number if you do not want to use the entire
available capacity for the new virtual disk.
9. (Optional) Change the other Virtual Disk Properties, if necessary.
10.ClickAccepttoacceptthecongurationofthenewvirtualdisk.
Note: Click the Reclaim button if you want to undo a virtual disk that you just
dened.
11.ClickNexttocontinuewiththenextcongurationstep.
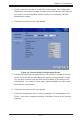
The Virtual Disk Summary window appears.
12.Reviewthecongurationshowninthewindow.Ifyouwanttochangesomething,
click Backandchangethecongurationparameters.