
User`s guide


3-2
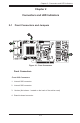
AOC-USASLP-H8iR Add-on Card User's Guide
WebBIOSCongurationWizard-AutoConguration
When using either Auto Conguration setting, do the following:
Whenpromptedtoreviewthenewconguration,reviewthesettings.1.
ClickAcceptorBacktochangeanysettings.(AutoCongurationwithRedun-2.
dancycreatesaRAID5congurationifatleastthreedisksareavailable.If
only two disks are available, the setup creates RAID 1.)
ClickYestosavetheconguration,andYesagaintoinitializethenewvirtual3.
disk.
WebBIOS CU will begin the initialization of the virtual drives.
WebBIOSCongurationWizard-CustomConguration
ThissectiongivesanoverviewoftheWebBIOSCustomConguraiton.Whenusing
theCustomCongurationsetting,consulttheWebBIOSdiskHelpleandotherLSI
documentation for more complete instructions.
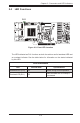
WebBIOS Conguration
TheCustomConrgurationwindowincludestwosections:PhysicalDrives1.
and Disk Groups. Press CTRL and select each ready desired physical drives
from the group. Select two drives for RAID 1 and three drives for RAID 5.
Click Accept DG.2.
For other RAID levels, repeat steps 1 and 2 and do the following: for RAID 10 3.
conguration,createasecondRAID1diskgroup.ForRAID50conrmation,
select physical drives for a second RAID 5 disk group.
Click Next when you have completed selecting drives for disk groups. 4.
Thespandenitionscreenappears.Selectoneoftheavailablediskgroups
and click Add to Span and click Next.
IntheVirtualDiskDenitionscreen,setthefollowing: 5.
RAID Level: To create a RAID 10 (spanned), add both disk groups you cre-
ated earlier to SPAN. Then click Next and select the RAID level on the virtual
diskdenition.DothesameforRAID50andRAID60.