
Installation Guide

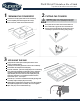

Position the sink (A) upside down on the countertop.
Trace completely around the edge of the sink (A).
Draw a line 5/16” inside of the outline of the sink.
Drill a pilot hole in all four corners of the inside line.
Use a saber saw or jig saw to cut on the inside line.
Place a support underneath the cutout portion of the
countertop to prevent it from falling during cutting.
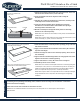
Apply silicone sealant (not included) around the cutout
on the countertop surface.
Carefully lower the sink (A) into the cutout in the countertop.
Preassemble the clamps and screws (AA).
From the underside - place the clamp (AA) in the center along
each side and hand tighten to hold sink in place. Fasten the
remaining clamps (AA) along the edges and space them
approximately 3 in. from each end, and equally along the
front, back and sides. For countertops thicker than 3/4 in.,
space them up to 1-1/2 in. apart.
From the top - check the seal between the sink (A) edge and
countertop. Adjust clamps (AA) if necessary.
Lightly tighten clamps (AA) evenly with a screw driver until the
sink is perfectly tight to the countertop. Do not over tighten.
Wipe away any excess sealant with a rag.
PREPARING THE COUNTERTOP CUTTING THE COUNTER
INSTALLING THE SINK
1 2
3
WARNING: Always wear safety goggles and gloves
when using power tools to prevent personal injury.
Top Mount Installation Instructions
Dual Mount Stainless Steel Sink
PAGE 2
Contact Superior Sinks at (678) 445-4638 or visit www.superiorsinks.com. Copyright ©2020. All rights reserved.