
Installation Instructions

5
IMPORTANT: If you notice both planks aren’t at the same height or are not well locked together,
please follow the disassembling instructions at the bottom of the page, disassemble and check if
any debris stuck inside the lock is obstructing. Failure to properly line up the end joint and
attempting to force it in while out of alignment could result in permanent damage to the end joint.
3. First row, last plank: At the end of the first row, leave an expansion gap of 1/4” / 6 mm to the wall
and measure the length of the last plank to fit.
4. To cut the plank: Use a simple utility knife and ruler, and with the top side facing up, cut heavily
and several times on the same axis. The knife needs to cut through the wood veneer. You can then
push one half of the plank down using your other hand to hold the second placing it very close to
the cut. The plank will split naturally.
5. Second row, first plank: Start the second row with the leftover cut part of the last plank of the
previous row. This small plank should measure at least 12” / 30 cm. Otherwise, cut a new plank in
half and use it to begin the second row. The end joints of each adjoining row should not be closer
than 8” / 20 cm to each other. Whenever practical, use the piece cut from the preceding row to start
the next row.
6. Second row, second plank: Click the long side of the plank into the previous row and place it tight
to the short end of the previous plank with an angle of 25-30 degrees. Drop the plank and gently
tap on the end with a rubber mallet so it firmly locks into the previous plank until both are at the
same height. Make sure both planks are perfectly aligned.
7. After finishing the installation of every row: Use scrap pieces and a small hammer or rubber
mallet to gently tap the planks into the click of the previous row to make sure they are tightly clicked
together and make sure there is no gap between the long side of the planks installed. Any gapping
can compromise the whole installation.
8. Tip: After the first 2-3 rows of planks are installed, they should be checked with a string line to
ensure that rows are still running straight. If they are not, it could be that the starting wall has some
irregularities that caused bowing in the installation. If so, the starting row of planks may have to be
scribed and re-trimmed to account for any unevenness in the wall. This can be done without having
to disassemble the beginning rows.
9. To lay the last row: Position a loose board exactly on top of the last row laid. Place another board
on top, with the tongue side touching the wall. Draw a line along the edge of this boards, to mark
the first board. Cut along the edge of this board to mark the first board. Cut along this line to obtain
the required width. Insert this cut board against the wall. The last row should be at least 2” / 50 mm
wide. The spacers can then be removed.
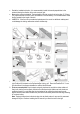
10. Holes for pipes: Measure the diameter of the pipe and drill a hole that is 1/2” / 12 mm larger. Saw
off a piece as shown in the figure and lay the board in place on the floor. Then lay the sawed-off
piece in place.
11. Door molding and skirting: Lay a board (with the decorative side down) next to the door molding
and saw as shown in the figure. Then slide the floorboard under molding.
II. FINISHING THE INSTALLATION
Replace molding or wall base, allowing slight clearance between the molding and the planks. Nail the
molding to the wall surface, not through the flooring. At doorways and at other areas where the flooring
planks may meet other flooring surfaces, it is preferable to use a “T” molding, or similar, to cover the
exposed edge but not pinch the planks. Leave a small gap between the planks and the adjoining
surface.
III. MAINTENANCE