
Installation Instructions

4
Decide the installation direction. It is recommended to install the boards perpendicular to the
window following the direction of the main source of light.
Measure the area to be installed: The board width of the last row shall not be less than 2” / 50 mm.
If so, adjust the width of the first row to be installed. In narrow hallways, it is recommended to install
the floor parallel to the length of the hall.
UNDERLAY: If the floor has a pre-attached underlayment, the use of an additional underlayment
could damage the locking mechanism and will void warranty.
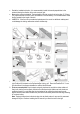
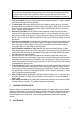
1. First row, first plank: After thoroughly cleaning the subfloor, you should begin laying from left to
right. Position the first plank so that grooved edge is facing you. Place the floorboard 1/4” / 6 mm
from the left wall. Use spacers between the wall and the floorboard.
2. First row, second plank: Drop the plank and gently tap down the end with a rubber mallet so it
firmly locks into the previous plank until both are at the same height. Make sure both planks are
perfectly aligned. It is crucial that after the short edges of two connecting planks are correctly
aligned, and the rubber mallet contacts the plank in the area directly above the short edge, allowing
for a correct locking.
Note: Tapping the area close to the short edge, but not directly above it, may result in permanent
damage to the joint. Continue installing the first row until you reach the wall on the right.