
Manual
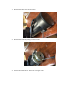
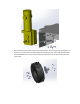

5. To mount the bracket, you will need to drill holes in the top plate of the chassis. Place the
bracket where you want to mount it (there is room behind the batteries) and mark the holes
with a sharpie. If you are mounting the bracket behind the batteries as in the picture above, two
of the holes will need to go into the tubing frame. For these two holes you have two options.
You can drill and tap into the aluminum if you have a tap set (for ¼-20 tapped hole drill a 13/64
pilot hole). Or you can drill all the way through the tube with a ¼” clearance hole and use a
longer screw.
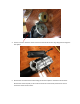
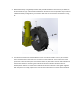
Inflating the tires
Before running the robot on the ground, make sure the tires have been inflated. Running the robot
with a flat tire can cause the tube to spin inside of the tire and damage the valve stem. For this
reason it is a good idea to check the tires periodically to make sure they are inflated.
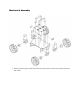
You are now done with the main mechanical assembly. For electrical assembly you can find the
schematic on our website:
Schematics
For additional support on wiring, soldering, and crimping, please read the following support pages:
Electric Motor Hookup Support
Electric Power Hookup Support
Soldering Tips
Crimping Wires