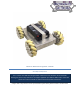
Mecanum Wheel Vectoring Robot - IG52 DB Assembly and Operation This is a chain drive 4WD base Programmable robot kit that uses 8" Nexus mecanum wheels allowing it to vector in any direction. It can support payloads up to 200 lbs. Make it RC or use it with sensors and a microcontroller to make it autonomous/semi-autonomous.
Mecanum Wheel Vectoring Robot - IG52 DB Contents Mechanical Assembly ................................................................................................................................................... 3 Electrical Assembly ..................................................................................................................................................... 10 Operation .............................................................................................................
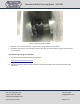
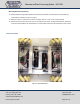
Mecanum Wheel Vectoring Robot - IG52 DB Mechanical Assembly 1. Mount the motors as shown in Figure 1, with the motor spacer plate between the motor and the chassis. Make sure to use Loctite on the screws. Do not fully tighten the screws at this point since the motors will need to slide to tension the chain. Once the motor is mounted, the small sprockets can be mounted on the motor shaft.
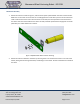
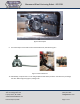
Mecanum Wheel Vectoring Robot - IG52 DB Figure 2: Wheel/axle assembly 3. Before mounting the wheels, note that they need to be oriented correctly in order for the robot to work properly. See the figure below for the correct orientation. Figure 3: Wheel Orientation SuperDroid Robots, Inc 224 Technology Park Lane Fuquay Varina, NC 27526 www.SuperDroidRobots.com Contact (919) 557-9162 SDR@SDRobots.
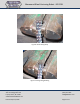
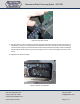
Mecanum Wheel Vectoring Robot - IG52 DB 4. Slide all 8 bearings into place through the bearing holes in the chassis. Slide a lock collar onto the axle, then slide the axle through the first bearing. At this point, put the key in the shaft and slide on the wheel sprocket. Finally slide the shaft through the second bearing. Slide another lock collar on to secure the inside bearing and slide the outside lock collar over to secure the outside bearing. Use Loctite on all set screws.
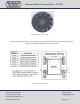
Mecanum Wheel Vectoring Robot - IG52 DB Figure 5: Sprocket with key installed 5. Measure, cut, and install the chain using the chain cutting instructions listed below. 6. Follow the instructions in the next section to wire the robot. Once finished with wiring the wheels and lid can be installed. Chain Measuring, Cutting, and installation 7. See the video tutorial below or follow the steps below. Roller Chain Cutting Instructional Video 8.
Mecanum Wheel Vectoring Robot - IG52 DB Figure 6: Chain layout 9. The easiest way to cut the chain is with a chain breaker tool, illustrated in Figure 7. Figure 7: Chain breaker tool 10. Alternatively, clamp the chain in a vise and grind/file the ends of the pins down. Then drive the pin through the chain. Refer to Figure 8, Figure 9, and Figure 10. SuperDroid Robots, Inc 224 Technology Park Lane Fuquay Varina, NC 27526 www.SuperDroidRobots.com Contact (919) 557-9162 SDR@SDRobots.
Mecanum Wheel Vectoring Robot - IG52 DB Figure 8: Chain Cutting Setup Figure 9: Chain grinding/breaking SuperDroid Robots, Inc 224 Technology Park Lane Fuquay Varina, NC 27526 www.SuperDroidRobots.com Contact (919) 557-9162 SDR@SDRobots.
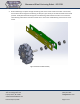
Mecanum Wheel Vectoring Robot - IG52 DB Figure 10: Chain Link removal 11. Once the chain is cut to size, install it around both sprockets and install the master link as shown in Figure 11. Alternatively, install the connecting link prior to installing the chain in the robot (so you have a loop of chain), remove the axles, wrap chain around the motor sprocket and the loose wheel sprocket, and then reinstall the axle through the wheel sprocket.
Mecanum Wheel Vectoring Robot - IG52 DB Mounting Electrical Components 13. Mount batteries using battery brackets and hardware provided. Use foam tape on the bracket and underneath the battery to ensure a snug fit. 14. Measure a place on the chassis to mount the switch. Drill a ½” hole or use a switch bracket. 15. Mount the motor controller to the front or rear plate of the chassis. If using 12Ah batteries, the motor controller will fit between the two batteries.
Mecanum Wheel Vectoring Robot - IG52 DB For electrical assembly please follow the schematic that is listed on the page below: Schematics For additional support on wiring, soldering, and crimping, please read the following support pages: Electric Motor Hookup Support Electric Power Hookup Support Soldering Tips Crimping Wires For hooking up the charger, a separate set of leads should be run from the battery through a fuse (for 4A charger use 5A fuse) to a 30 Amp connector set.
Mecanum Wheel Vectoring Robot - IG52 DB General Terms 1. SuperDroid Robots, Inc is not responsible for special incidental or consequential damages resulting from any warranty or under any legal theory, including, but not limited to lost profits, downtime, goodwill, damage to, or replacement equipment or property, or any cost of recovering, reprogramming, or reproducing any data stored. ANY LIABILITY SHALL BE LIMITED TO REPLACEMENT OF DEFECTIVE PARTS. SuperDroid Robots, Inc.