
Manual


IG42-DB4, 4WD All Terrain Heavy Duty Robot Platform
SuperDroid Robots, Inc Contact
224 Technology Park Lane (919) 557-9162
Fuquay Varina, NC 27526 SDR@SDRobots.com
www.SuperDroidRobots.com
Revised: February 8, 2019 Page 4 of 10
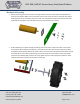
3. Measure, cut, and install the chain using the chain cutting instructions listed below.
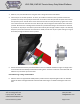
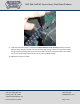
4. Install roll pins in the axle sprockets. To do this, first make sure that the motor sprocket and the axle
sprocket are lined up. It may help to loosen both set screws on the axle sprocket and power the motor so
the sprocket spins on the axle but is free to move side to side. Once they are lined up, tighten one of the
set screws and remove the other set screw. Drill a 5/32” hole through the shaft and the other side of the
sprocket. Be careful not to damage the threads of the sprocket while doing so. Drill the hole as centered
as possible. It may help to start with a 3/16” drill bit and only drill enough to make a dimple. This will help
keep the 5/32” drill bit centered. Once the hole is drilled, hammer the roll pin in place making sure it goes
all the way through the bottom of the sprocket.
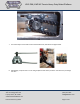
5. Mount the batteries with the provided hardware. Foam is included if needed for a tight fit. Simply stick it
to the underside of the battery bracket before bolting down. The foam can also be used underneath the
batteries to space them up over the weld.
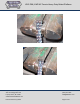
Chain Measuring, cutting, and installation
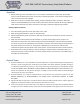
6. With the motor in its approximate middle position, measure out the required length of chain. You will want
full links as shown in the figure below to insert the master link through. You will be removing the outer cross-
links.