Electric Power Cart Operator's Manual WARNING: Read carefully and understand all INSTRUCTIONS before operating. Failure to follow the safety rules and other basic safety precautions may result in serious personal injury. Save these instructions in a safe place and on hand so that they can be read when required. Keep these instructions to assist in future servicing.
SPECIFICATIONS Item No. GUO095 Rating 48 Volt DC/500W Loading Capacity 230kgs/500lbs Battery Pack 48V,2Ah,96Wh Lithium Battery Speed Forward:0-7km/h Variable, Reverse: 0-3.5km/h Variable POWER CART SAFETY USE WARNINGS 1. Keep work area clean and well lit. Cluttered or dark areas invite accidents. 2. Wear shoes with non-slip treads. If you have safety shoes, wear them. Do not use your power cart while barefoot or wearing open sandals. 3.
these are connected and properly used. Use of dust collection can reduce dust-related hazards. 9. Does not let familiarity gained from frequent use of tools allow you to become complacent and ignore tool safety principles. A careless action can cause severe injury within a fraction of a second. 10. Always wear protective goggles to protect your eyes from injury when using power tools. 11.
6. Avoid body contact with earthed or grounded surfaces, such as pipes, radiators, ranges and refrigerators. There is an increased risk of electric shock if your body is earthed or grounded. 7. Do not expose power tools to rain or wet conditions. Water entering a power tool will increase the risk of electric shock. 8. Do not abuse the cord. Never use the cord for carrying, pulling or unplugging the power tool. Keep cord away from heat, oil, sharp edges or moving parts.
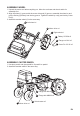
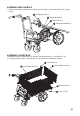
ASSEMBLE WHEEL 1. Unpack the carton and take everything out. Move the cart base and wheels aside for assembly first. 2. Align the wheel (1) groove with the motor drive axle (2) groove, assemble the wheel on and put the flat key(3) entirely into the key groove. Tighten the wheel by nut(4) and lock by Cotter Pin(5). 3. Assemble another wheel (6) in the same way. 6 Left wheel x1 2 Motor driver x1 1 Right wheel x1 3 Flatkey 5*5*25A x2 4 Flange nut M14 x2 5 Cotter Pin 3.2*36 x2 ASSEMBLE CASTER WHEEL 1.
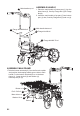
5 Main handle top x1 6 Flange bolt M8X40 x2 ASSEMBLE HANDLE 1. Place the main handle of bottom part (1) into the base frame (2), fixed by Flange bolt (3) & Flange Nut(4). 2. Insert the main handle of top part (5) into bottom part (1) tube, fixed by Flange bolt (6) and nut (4). 1 Main handle bottom x1 4 Flange Nut M8 x6 3 Flange bolt M8*70 x4 ASSEMBLE MAIN FRAME 1.Take the bottom wire deck(2), face the flat wire upside and position the dumping handle groove side to main handle.
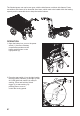
ASSEMBLE MAIN HANDLE 1. Attach the dumping handle(3) to the bottom wire deck(2), screwed by Flange bolt (1) and nut(4). 3 Dumping handle x1 4 Flange Nut M8 x2 2 Bottom Wire x1 1 Flange bolt M8X45 x2 ASSEMBLE GUARD BAR 1.Assemble the left & right frame (3), and the front & back frame (1), locked by Pin (5). 2. Locking the entire frame by handle bar (4), the electric cart assembly finished.
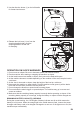
The finished power cart can be two types, with the side frames or without side frames. Power cart without side frames is for abnormal sizes items, which need to be loaded within the loading capacity and in reasonable size to keep the cart be balance. OPERATION 1. Open the battery box, turn on the power switch (1), there are 2 battery compartments,make sure the battery switch button on the right position (2). 2 1 2.
3. Use the direction button (1) on the left handle for forward and reverse. 1 4. Release the lock lever (1) out from the dumping handle holder, push the dumping handle to lift the cart for dumping. 1 OPERATION ON SLOPS WARNINGS 1. Do not cross on slopes. Be sure to decrease speed and exercise caution. 2. Exercise caution when starting or stopping the machine on slopes. 3. As the loads become less stable on slopes, firmly secure the loads with ropes. 4.
BATTERY CHARGE 1. Battery charge: When the battery in low capacity, please do recharge. Open the battery box, unplug the lithium battery, and connected with the charge (1) side., and connect the charge plug (3) with electric power to start charging. Once the adaptor light (2) turns green, the battery is fully charged.It usually takes about 1-2 hours. For a long service life of the battery, please recharge only with charger specified by the manufacture.
PARTS BREAKDOWN Part No. Q’ty Part No. 1 Left handle switch 1 23 Chassis Frame 1 2 Round tube handle (Up) 1 24 All Metal Hex Lock Nuts M14 2 3 Turn right handle 1 25 Cotter pin 3.
Great Circle USA Support Line: 1-866-493-0524 help@greatcircleus.com www.greatcircleus.