
Instructions / Assembly

Installation
Instructions.
Wall Panels
1. Gluing straight onto the wall:
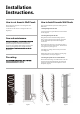
There are three different options for installing Acoustic
A construction glue or grab adhesive is recommended
for this. (Figure 1)
Figure 1 Figure 2 Figure 3 Figure 4
2. Screwing directly into the wall:
Using black screws for the black backing option or
silver or grey screws for the grey-backing, the panels
can be screwed directly into the wall through the
acoustic felt.
We recommend a minimum of 15 screws per panel at
3.15” intervals across the width and 11” intervals down
the length of the panel. (Figure 2)
If installing into ceilings, make sure they are screwed
into ceiling joists.
into plasterboard, for example. (Figure 3)
Please make sure the correct fixings are used if going
3. Screwing the panels into 1.8” timber battens:
We recommend screwing 1.8” timber batons to the wall
and then screwing the panels directly into the batons
through the acoustic felt to achieve optimum sound
absorption. (Figure 4)
if possible. Something like wood oil is perfect as it
protects and keeps the natural look and feel of the
wood. Once this is applied, light dusting or hovering will
prevent any dust build-up. If you choose to keep the
panels down.
We recommend a sharp saw to cut through the slats
and felt width ways.
A craft knife can be used to cut through the felt to cut
lengthways.
How to Install Acoustic Wall Panels
Care and maintenance.
Fire rating.
How to cut Acoustic Wall Panels