
Install Instructions


13 of 24 © 2015 Watts Radiant
If installing on top of existing slab, secure CableStrap to the surface. Use nails or similar, every
6 to 10 inches. CableStrap should be placed at either end of the heated area, and additional
straps should be applied every 3 to 4 feet in between to hold the cable in place during surfacing.
STEP 3.5
Use a digital multi-meter to measure the resistance between the conductors of the cable
power leads again. Record these resistances in Table 4 under “After cable is secured in place".
STEP 3.6
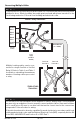
Feed the power leads through the conduit into the junction box, leaving at least 6 inches of free
lead length. Secure the heating cable and splice so that they will not be pulled into the conduit.
Insert a generous amount of electrical conduit sealant into the conduit end around the power
leads to prevent water entry.
STEP 3.7
Feed the sensor wire through the sensor conduit, leaving at least 6" of free lead length at the
control electrical box. If the sensor tip is directly embedded in the slab, secure it using a cable
tie. Make sure the sensor tip is located about 1" below the surface, half-way between heating
cables, and at least 1' into the heated area.
STEP 3.8
Take a photo of the cable installation. This can be very helpful later for utility work, changes
to the site, etc. to avoid possible damage. Keep the photos with this installation manual and
provide to end user upon completion.
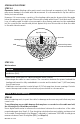
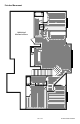
Top-Down view of SlabHeat cable and the slab sensor entering slab.
SlabHeat Cable
In-slab sensor
Conduit
Power
Lead
Factory Splice
(in concrete,
not in conduit)