
SlabHeat Installation Manual


6
STEP 1.5
Select the cables you need.
WATTAGE: Decide what heat output is required. Your design must consider the size of the space being heated as well as the heat
loss for the space.
15 watts per square foot: sufficient for sun room floors, basements, bathrooms, and kitchens
10 watts per square foot: sufficient for hallways, entry ways, and large areas with low heat loss
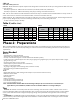
SIZE: Select a cable in Table 2 to fit the heated area measured in Step 1.3. SlabHeat Cable is manufactured in a variety of sizes as
shown. If the exact size of cable is not found in the Table, select the next smaller cable size.
AMPS and VOLTS: Pay careful attention to the amps to make sure your controls, circuit breaker panel, and all wiring will have the
proper capacity. Design circuit protection and wiring to handle 125 percent of heating cable load:
-20 amp circuit for load up to 15 amps
Table 2 (cable sizes)
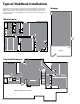
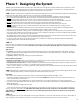
Phase 2: Preparations
Before installing SlabHeat, make sure to fully inspect the products, and carefully plan your site. The following steps may not
necessarily occur in the order shown, depending on contractor and electrician scheduling and variations in site preparation
requirements.
Items Needed
Materials:
-CableStrap (for certain installations)
-Thermostat control with floor sensor (SunStat)
-20-amp circuit breaker (single for 120-VAC and dual for 240-VAC systems)
- Listed electrical box (extra deep) for the control; single-gang (not a gangable type) or 4"-square deep box with a single-
gang "mud ring" cover
-4" junction box with a cover, if needed
-Cable clamps for junction box (for new construction)
-Flexible or rigid Listed conduit
-12-gauge or 14-gauge electrical wiring cable (consult local code)
-Wire nuts if using an additional junction box
-Nail plate
Tools:
-Digital multi-meter [for ohms testing; must read up to 20,000 ohms to measure sensor]
-Drill with 1/2" & 3/4" bits
-Hammer and chisel
-Wire strippers
-Phillips screwdriver
-Fish tape (for existing construction)
-Hole saw (for existing construction)
-Floor covering installation tools
Note: Installer must be familiar with electrical wiring techniques (licensed electrician recommended). If
applicable for your installation, installer must also be familiar with floor covering techniques.
Tips
Controls: The SunStat controls will provide direct floor-warming control for better comfort. SunStat controls can also
sense air temperature with a floor temperature limit. Other controls may not give the same desired level of control. Always
select controls that will meet the voltage and amperage ratings of the system and are designed for resistance heating
systems.
LoudMouth: The LoudMouth sounds an alarm if damage occurs to the cable during installation. The LoudMouth stays
connected to the power leads throughout the cable installation. A small screwdriver for connecting the leads is included
with the LoudMouth monitor.
240V
Model
15 W/sqft
4" Spacing
(Sq Feet)
10 W/sqft
6" Spacing
(Sq Feet)
Cable
Length
(Feet)
Amp
Draw
Ohms
SH15240100 100 149 294 6.3 33 - 41
SH15240132 132 196 388 8.3 23 - 30
SH15240164 164 243 483 10.3 18 - 23
SH15240200 200 297 590 12.5 15 - 20
SH15240228 228 339 673 14.3 13 - 17
120V
Model
15 W/sqft
4" Spacing
(Sq Feet)
10 W/sqft
6" Spacing
(Sq Feet)
Cable
Length
(Feet)
Amp
Draw
Ohms
SH15120050 50 75 146 6.3 16 - 21
SH15120066 66 98 193 8.3 11 - 15
SH15120082 82 122 241 10.3 9 - 12
SH15120100 100 149 294 12.5 7 - 10
SH15120114 114 170 336 14.3 6 - 9