
SlabHeat Installation Manual


14
Phase 5: Controls and Sensors
STEP 5.1
De-energize all circuits feeding this system before doing any electrical work.
STEP 5.2
If necessary, make wire connections at junction boxes for the SlabHeat Cable power leads to the power wiring from the control.
STEP 5.3
Install the control at its location according to the instructions provided with the control. Make wiring connections to the power source
and to the sensor wires and cable lead wires.
CAUTION: The ground wire supplied with the cable must be connected to a suitable
grounding/earthing terminal.
STEP 5.4
After careful inspection of all wiring, connect the power supply wiring to the circuit breaker and turn it on.
Phase 6: System Operation
After all system components are in place and floor coverings installed, briefly test the operation of the system but do not put the
system into full operation until the mortar materials are fully cured (typically one to four weeks). See the mortar manufacturer's
recommendations for the specific type of mortar used.
Many manufacturers of laminate and wood flooring recommend a maximum of about 84F (29C) on the floor surface. Be sure to
program the control accordingly. Consult the manufacturer regarding recommended floor temperatures for the flooring being
installed.
Energize the system. Operate the controls so that the system turns on the SlabHeat Cable. The control will normally indicate that
power is being supplied to the cable. It will take some time for the cable to warm up. Using a clamp-type ammeter (electricians
normally carry these), pull the control out of the wall and determine whether the cables are pulling current, thus indicating they
are working as intended. Turn the system off after NO MORE than 10 minutes of operation. Do not operate the system again until
the floor concrete and mortar are cured. Once the flooring is completely cured, the control can be used to operate the system for
many years to come.
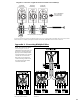
Refer to Typical Wiring Diagrams on pages 16 and 17.