
SlabHeat Installation Manual


11
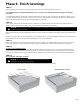
Phase 3: Installation of Cable
The following Steps 3.1 through 3.9 cover installation basics. Step 3.10 covers some specific applications and their special
requirements.
BASIC INSTALLATION
STEP 3.1
Determine a time to install the cable when equipment, heavy tools, and site traffic will be minimal to keep from possibly damaging
the product. Be prepared to apply the surfacing courses over the cable the same day so it will be protected from damage.
If installing cable in the upper layer of a two-stage concrete slab, the cable should be completely ready for the second stage. There
is limited time between stages, as the slab should not be allowed to fully cure. Therefore, when using SlabHeat Cable, you may
want to lay it out and tie it to rewire that can be quickly lifted into place after the first is laid.
Inspect the area and remove any sharp objects.
Install in temperatures at least 50°F (10°C).
STEP 3.2
Begin by test-fitting the cable in the area to be heated. Make sure it fits the area with no excess cable.
WARNING: This heating cable CANNOT be cut shorter to fit! Do not overlap or cross over heating cable on itself.
Do not space heating cable closer than 4 inches. Failure to do so may result in damage to the product and
dangerous overheating.
• Avoid crossing expansion joints in a slab, unless proper technique and protection steps are followed
(see Step 3.10 on page 12).
• Avoid placing the heating cable any closer than 4 inches from other items such as underground cable or piping and 6 inches
from toilet rings to keep from overheating them.
WARNING: The heating cable and factory splices of SlabHeat Cable must be completely embedded in the concrete.
Failure to do so may result in damage to the product and risk of fire. Never try to use up excess heating cable in surrounding
walls or other unprotected applications.
• Do not repeatedly bend the heating cable, and never bend factory splices.
• Never install heating cables in direct contact with non-masonry materials such as insulation board, vapor barriers, vinyl goods,
etc. Damage may result.
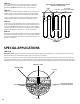
• For a new concrete slab, when a run of cable exceeds 20 feet, an additional downward U-shaped loop with a 1 to 2 inch radius,
should be added to help minimize possible damage to the cable from thermal expansion.
STEP 3.3
Place the power leads of the cable next to the conduit entry. The electrician will pull this through the conduit later. Make sure it is
positioned so that no part of the splice connection or the heating cable will be pulled into the conduit.
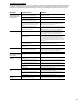
STEP 3.4
SlabHeat Cable: Begin securing the heating cable at the desired spacing to the reinforcement mesh or rebar using plastic cable ties.
These cable ties should be applied at the ends of each run and at every 2 to 3 feet. Turn the cable tie ends downward, or trim them so
they will not poke up through the surface layers. Do not use metal ties as they may damage the cable.
If installing on top of existing slab, secure CableStrap to the surface. Use nails or similar, every 6 to 10 inches. CableStrap should be
placed at either end of the heated area, and additional straps should be applied every 3 to 4 feet in between to hold the cable in place
during surfacing.