
Install Instructions


15 of 24 © 2015 Watts Radiant
Make sure the heating cable is fully embedded, as well as 2 to 6 inches of the conduit(s)
enclosing the power lead and slab sensor wiring.
Allow the concrete to fully cure as required by the concrete supplier. Do not energize the
SlabHeat Cable except to briefly test it, as this would improperly accelerate the curing and
potentially cause concrete damage.
STEP 4.3
Make a final inspection of the installation. Take another resistance reading! Use a digital
multi-meter to measure the resistance between the conductors of the cable power leads.
Record these readings in the Cable and Sensor Resistance Log (Table 4).
STEP 4.4
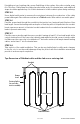
Ceramic or Stone Tile Applications
Apply mortar and tile such that the heating cables in the slab will be no more than 1-1/2" to 2"
below the top finished surface. Greater depth than this will reduce the system performance.
Install following manufacturer's recommendations. Tile should be installed in accordance
with Tile Council of North America (TCNA) and American National Standards Institute (ANSI)
guidelines.
STEP 4.5
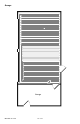
Wood, Laminate, and Carpet Coverings
The combined R-values of all floor coverings over the SlabHeat Cable should not exceed R-3.
Do not use sharp tools which could damage the SlabHeat cable. Blunted shovels should
allow you to work the concrete carefully into all areas.
Do not use floor coverings that require nailing into the floor, or damage to the heating cable
may result.
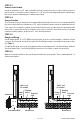
TILE OVER SLAB WOOD/LAMINATE OVER SLAB
STEP 4.2
Pour concrete over the base and SlabHeat Cable so that there is a minimum of 3/4" of material
above the heating cable. The SlabHeat Cable should be no more than 1-1/2" to 2" below the
top finished surface of the floor.