
Install Instructions
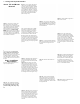
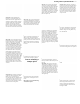
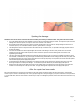
Table Of Contents
- Repair-SunTouch-Heating-Wire-Instructions-Manual-Current-WYF
- wr_electricfloorwarming_instructions_repairtips-en
- ADDITIONAL TIPS
- V.1 5/24/05
- Disclaimer: The following are tips and techniques provided by Watts Radiant, Inc. to assist in discovering and uncovering damage made on-site to an electric radiant heating system product made by this company. Watts Radiant does not, in any way, guaran
- Finding damage within floor warming systems
- Spotting the damage

Spotting the damage
CAUTION! Power for this circuit must be turned off at the breaker panel before you handle the cable. Verify that it has been turned off.
• A lot of the damage that occurs during installation is from the edge of a metal trowel cutting into a cable. This may leave a place of obvious
damage where wires are exposed, or it may look like a dent or a crease in the insulation.
• Don’t gouge the wire further by probing a “crease” in the blue insulation with a knife or similar tool. Gently bending the cable to see if a
crease will “open up” is a much better method of inspection, pictured above, on the right.
• The damaged area of the wire may have rolled to the bottom and may now face the floor, it is important to thoroughly inspect all sides of
the cable for damage.
• If the outer blue insulation has been mildly damaged, but the extent of the damage is unknown, leave yourself some kind of marker
indicating this point may require further inspection, and then continue to inspect the rest of the heating cable in this area for more
significant signs of damage.
• The power supply leads and heating cables have occasionally been punctured by a nail or a screw from installation of sheetrock, shower
door hardware, or baseboard trim. Any of these types of materials being installed after the floor heating system has been put in place, have
the potential to damage a wire in your system. Pulling that nail or screw may temporarily “fix” the problem, but the wire should be repaired
and reinsulated properly with the appropriate splice kit.
• A cable that has been damaged by a penetration from a staple is generally not too difficult to find, though the hole may be very small.
Removing the staple will not really fix the damage. You will need to splice the cable at this point with the appropriate splice kit.
• Hammers and other heavy objects have been known to crush heating cables. The damage may look like an abrasion of the outer blue
insulation or an abnormally thin or flat spot in the cable. This type of damage also requires the use of the appropriate splice kit.
After the repair has been made
We recommend that the floor coverings not be replaced over the repair location until after the system has been turned back on, and has had a
chance to cycle on and off for at least a day or two. This is typically enough time to verify the integrity of your splice connections. If the repair location
is in a high traffic area, extra care must be taken to ensure that your repair is not damaged by the traffic, and to ensure that it does not become a trip
hazard.
Page 2
2