
Install Instructions
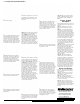
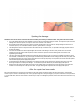
Table Of Contents
- Repair-SunTouch-Heating-Wire-Instructions-Manual-Current-WYF
- wr_electricfloorwarming_instructions_repairtips-en
- ADDITIONAL TIPS
- V.1 5/24/05
- Disclaimer: The following are tips and techniques provided by Watts Radiant, Inc. to assist in discovering and uncovering damage made on-site to an electric radiant heating system product made by this company. Watts Radiant does not, in any way, guaran
- Finding damage within floor warming systems
- Spotting the damage

ADDITIONAL TIPS
V.1 5/24/05
Disclaimer: The following are tips and techniques provided by Watts Radiant, Inc. to assist in discovering and uncovering damage made on-site to an
electric radiant heating system product made by this company. Watts Radiant does not, in any way, guarantee the tips presented here nor have any
responsibility for damage or other problems incurred by following these tips.
Finding damage within floor warming systems
Experience has shown a few things that can help in troubleshooting the radiant heating cables and tips for the work that follows. Here are a few
things to consider when looking for a damage location:
• The power supply leads or heating cable can be penetrated by a nail or screw while installing baseboard trim, sheetrock, or other things
that were installed after the wires were put in place. Be aware of all subsequent work done in the area of the heating cable, and consider
the possibility that such things may have contributed to the problem you have experienced.
• Plumbers have been known to run the water supply line to a toilet after the tile has been set. Drilling the hole for the water line has been
known to cut heating cable wires if they were placed in that area.
• Simply dropping a hammer, or some other heavy object on the heating cable can damage the insulation of the heating cable. The cable
might work for quite a while before this kind of damage becomes evident.
• It is important that you exercise extreme caution while removing the mortar or grout around a tile. We do not recommend using a knife or
chiseling for this, you could cut a wire.
• On a few occasions, the LoudMouth™ monitoring device has given the installer a false “damage” signal, primarily due to the moisture
content of recently applied very wet thin-set mortar, or self-leveling compounds. If your LoudMouth has sounded, but you don’t find any
evidence of damage with your digital ohmmeter, call our technical support staff for assistance, 888-432-8932.
Wire locating equipment
We’ve found the Fluke Corporation brand "Cable Fault Finder" works well for our products, but many electricians have used some other brand of
“fault finder”. Electricians in your area may have a test instrument in their own bag of tricks that may be helpful in pinpointing the damage in your
heating cable. Please let our staff know about any successful damage location methods or tools, so we can pass on that information in the future.
Removing Tile
CAUTION! Power for this circuit must be turned off at the breaker panel before you start to remove tile. Verify that it has been turned off.
• It is important that you exercise extreme caution while removing the mortar or grout around a tile. A knife or chisel is generally not the best
tool for removing grout, you could end up cutting a wire.
• The first picture below shows a hand held grout removal tool, use this to remove about half of the grout from the seams. This should
reduce the chances of a crack spreading from the tile you are removing, to an adjacent tile.
• Don’t use a chisel, knife, screwdriver or similar tool to pry up the tile(s). The best tool for safely removing ceramic tile over a heating cable
is a small hammer, shown in the second picture below. Use it gently, to gradually break up a single tile at a time. Use a "shop-vac"
frequently to remove the loose material as you proceed, pic. # 3.
• After you are able to clearly identify the spacing and layout of the heating cable, you will know where you must be extremely careful while
you continue to remove the tile and mortar. In the areas between the heating cables you don’t have to be as cautious as when working
directly over or around a heating cable.
1