
User Manual

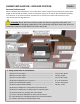


1. REMOVE HOOD
2. Ensure Burner Control Knobs are on the “OFF” position, Turn on the gas supply
valve.
3. Each Knob Corresponds to each burner, from Left to Right is CENTER, INNER, &
OUTER (Each Knob has its own Ignition)
4. Push & Turn the Knob labeled CENTER and slowly Rotate Counter-Clockwise to the
High Position. (Burner must be filled sufficiently for ignition to happen; other larger
burners will be easier to ignite once center burner is ignited)
5. You will hear a loud click as the Valve Piezo-Igniter produces a spark at the Burner.
Listen for the sound of the gas igniting and look for a flame through the cooking
grids. If the burner does not light on the first try, repeat immediately. (Ignition uses
a Thermocouple that if not heated sufficiently gas will shut off)
6. If the burner does not light in 5 seconds, then wait five minutes until the gas clears
before attempting to light it again. Repeat the procedure or try the manual lighting
procedure detailed below.
7. Upon successful lighting, ignite neighboring burners on, it is normal to hear a
popping sound when the burners are turned off.
NOTE: To light gas grill with a gas lighter, make sure the grill has been leak tested and burners be
properly located. Insert long-necked gas lighter through the cooking grid, placing near a burner side. Turn
the closest burner knob on to “HIGH” setting to release gas. Turn on the button on gas lighter, burner
should light immediately. Adjust burners to desired cooking temperature.
WARNING: Never stand with your head directly over the Grill when
lighting the Burner, to prevent possible injury.
BURNER
START
-
UP
–
LIGHTING THE POWER BURNER
PAGE 16
EXPLOSION: Never Operate the Burner Unattended. When Igniting the Grill
– Always keep the Hood Open.
ATTENTION: Always take a leak test before lighting the grill to prevent a
possible fire or explosion. DO NOT smoke while leak testing. Extinguish all open
flames. Never leak test with an open flame or risk of serious harm to self or
others.