
User Manual


ATTENTION: Never build an enclosure under the Burner or partition side walls, the
Burner must be Free Hanging supported by the countertop only! Must have clear access to
underside of burner within reach of at least Two Vents.
BURNER INSTALLATION
–
RECESSED POSITION
PAGE 8
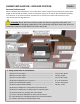
2. Drop-down Slide-in Installation
(A) Burner Cut-out Width---------------------------------------------------------- 22-3/4” Min. Width
(B) Burner Cut-out Height--------------------------------------------------------- 10” Min. Height
(C) Burner Cut-out Depth---------------------------------------------------------- 22-1/2” Min. Depth
(D) Minimum Height burner is recessed--------------------------------------- 8” to 12” Maximum
(E) Minimum Recessed Box Depth----------------------------------------------- 24” Min. Box Depth
(F) Minimum Recessed Box Width----------------------------------------------- 28” Min. to 30”
(G) Must have TWO Vents in HIGH position for Natural Gas
(H) Must have TWO Vents in LOW position for Liquid Propane
(I) Pot-Filler Notch out, see page 4 for more details
(J) Leave 2” Minimum Allowance on either side of Cut-Out
(k) Leave Minimum ¾” Gap below Drip Pan for Air/Gas Ventilation
(L) Properly stow-away the Liquid Propane Tank
Recessed Position Install
When installed as Recessed Position, this is most often used for Large Crock Pot Cooking, by lowering the
height of the cooktop this makes it easier to maneuver heavy pots on and off. We recommend elevating
the counter 8” to 12” lower and leave a minimum of 2” clearance on either side so that you have 1”
clearance beyond the edge of burner.