VERSA SIDE BURNERS USE & CARE GUIDE Read all instructions before you operate your Side Burner, Save these instructions! ATTENTION: THE SIDE BURNER MUST BE INSTALLED ACCORDING TO THE INSTALLATION GUIDE. IF YOUR SIDE BURNER INSTALLATION DOES NOT MEET THE BASIC SETUP INSTRUCTIONS ALL WARRANTIES MAY BE VOID. SEE WARRANTY ON LAST PAGE.
Welcome & Congratulations Congratulations on your purchase of a new Sunstone Side Burner! We are very proud of our product and we are completely committed to providing you with the best service possible. Your satisfaction is our #1 priority. Please read this manual carefully to understand all the instructions about how to install, operate and maintain for optimum performance and longevity. We know you’ll enjoy your new burner and thank you for choosing our product.
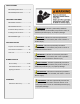
SPECIFICATIONS SUN13VSB Specifications----------------1 SUN13VDB Specifications---------------2 LOCATING THE BURNER SUN13VSB Installation-------------------3 SUN13VDB Installation------------------4 Installation Requirements--------------5 Installing Under Structure--------------6 SUN13VDB LED Light--------------------7 GAS INSTALLATION Propane Tank Connections---------8-9 Natural Gas Installation---------------10 Leak Test-----------------------------11-12 BURNER STARTUP Burner Safety-------------------
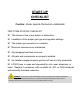
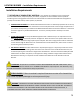
START-UP CHECKLIST Caution: Never operate the burner unattended. FIRST TIME STARTUP CHECKLIST The burner is free of any debris or obstruction. Installation of the proper gas type and regulator settings. The proper gas connection is complete. Minimum clearances are maintained. All packaging has been removed. All parts and components are properly installed. An installer-supplied manual gas shut-off valve is fully accessible.
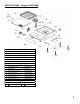
SPECIFICATIONS – Diagram SUN13VSB No. Name Qty Part No.
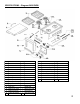
SPECIFICATIONS – Diagram SUN13VDB No. Name Qty Part No. No. Name Qty Part No.
LOCATING BURNER – SUN13VSB Installation Single Side Burner Cut-Out The Versa Single Side Burner is SELF-RIMMING, meaning the lip of burner rests on top of the counter edge around the cut-out and is Free Hanging from counter top. The Burner will rest into the Cut-Out only 2-1/4” Height which allows you to installed with large drawer unit below. The Port-Hole in back of Burner is used when Burner is placed on Counter with flexible gas hose to be fed through to gas connection within.
LOCATING BURNER – SUN13DSB Installation Double Side Burner Cut-Out The Versa Double Side Burner is SELF-RIMMING, meaning the lip of burner rests on top of the counter edge around the cut-out and is Free Hanging from counter top. Make Cut-Out according to details below, remember if counter overhangs make 1x1 notch Cut on Left & Right sides to allow Burner to rest flush against island wall. Be sure to make all Electrical & Gas Connections to back of Burner before sliding into position. See pages 7 thru 10.
LOCATING BURNER – Installation Requirements Installation Requirements ** DEFINITION OF COMBUSTIBLE MATERIAL - Any materials of a building structure or decorative structure made of wood, compressed paper, plant fibers, vinyl/plastic or other materials that are capable of transferring heat or being ignited and burned. Such material shall be considered combustible even though flameproofed, fire-retardant treated, surface-painted, or plastered. 1.
LOCATING BURNER – Installing Under Structure Overhead Structure Definition: Structure built above Appliance that is sometimes attached to the home’s exterior outside wall or roof and there is a Minimum of “Two” adjacent sides which are open with outside exposure. Minimum Distances to Combustible Materials or another Appliance ONLY, Maintain Minimum Six-Inch Clearance to Structure around interior of Appliance! A. B. C. D. E.
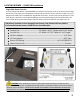
INSTALLING COMPONENTS – SUN13VDB LED LIGHT 1. Locate the Transformer Remove the transformer from the plastic bag located in the interior of burner box. Make sure the Transformer is complete, and double check the plug cord is properly secured to transformer, and all wires are firmly fixed into plastic clip plug. Connect to Left Back Side 2.
GAS INSTALLATION – Propane Tank Connections ATTENTION: Before connecting burner to gas source, make sure BBQ Burner control knobs are in “OFF” position. Verify the type of gas supply to be used, either natural or LP, and make sure the marking on the appliance rating label agrees with that of the supply. All pipe sealants must be an approved type and resistant to the actions of LP gas. Never use pipe sealant on flare fittings.
GAS INSTALLATION – Propane Tank Connections Hose and Regulator The Type 1 connection system has the following features: The system will not allow gas to flow until a positive connection has been made. NOTE: The cylinder control valve must be turned off before any connection is made or removed. The system has a thermal element that will shut off the flow of gas in the event of a fire. The system has a flow limiting device which, when activated, will limit the flow of gas to 10 cubic feet per hour.
GAS INSTALLATION – Natural Gas Installation Natural Gas Burners are designed to operate on Natural Gas ONLY, at a pressure regulated at 4” water column (W.C.) when equipped with the correct natural gas orifices on the valves and a NG regulator on the supply line regulated at the residential meter. Natural Gas Supply Connection and Disconnection 1. Make sure all burner valves are in the “OFF” position. 2. To connect-push back sleeve of socket, insert Plug release sleeve.
GAS INSTALLATION –Leak Test WARNING: Always perform a leak test before lighting the burner to prevent a possible fire or explosion. Never store a spare propane cylinder in the vicinity of this Burner, or in the vicinity of any other potential heat source. Never attempt to attach this burner to the self-contained LP gas system. Do not use burner until leak testing. Before Testing DO NOT smoke while leak testing. Extinguish all open flames.
GAS INSTALLATION –Leak Test Liquid Propane Leak Testing Procedure Test connection from LP Tank to Regulator Natural Gas Leak Testing Procedure Test connection from burner to LP Hose regulator If unable to stop gas leak, turn gas off Test connection next to NG regulator Test connection from gas line to adapter Test Quick Disconnect SAFETY CHECKS –Attention & 12
BURNER STARTUP –Burner Safety For Household Outdoor Use Only – DO NOT use indoors or in any type of enclosed area such as a garage or shed. Keep clear of trees and shrubs. The Side Burners are for Residential Use Only. The area surrounding your new side burner should be kept clean and free from flammable liquids and other combustible materials such as mops, rags or brooms, as well as solvents, cleaning fluids, and gasoline.
BURNER STARTUP - Burner Safety Never lean over the burner when flame is ON. Do not place clothing or other flammable material on or near the burner. Do not wear loose-fitting clothes or long sleeves while using the side burner as some fabrics can be highly flammable. Have an ABC fire extinguisher accessible. Never attempt to extinguish a grease fire with water or other liquids.
BURNER STARTUP - Care & Maintenance ANNUAL CLEANING OF BURNER HOUSING Burn-off the burner after use will keep it ready for instant use, however, once a year you should give the entire burner a thorough cleaning to keep it in top operating condition. 1. Shut off gas supply at source and disconnect fuel line. Protect fuel line fitting. 2. Remove and clean the cooking grids. 3. Brush the inside and bottom of the burner with a stiff wire brush, and wash down with a mild soap. 4. Check electrode. 5.
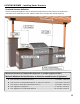
GRILL STARTUP –Lighting the Burner WARNING: When Lighting the Burner. DO NOT RELEASE KNOB, GAS WILL CONTINUE TO FLOW. Lighting Instructions Remove Cover Ensure Burner Control Knobs In the “OFF” position, Turn on the gas supply valve 1. Push the burner knob in and slowly rotate counter-clockwise to the high position. Listen for the sound of the gas through the Brass-Burner Tip: It is normal to hear a popping sound when the burners are turned off.
SUNSTONE VERSA SIDE BURNER WARRANTY “ALL WARRANTIES ARE VOID IF BURNER IS NOT INSTALLED ACCORDING TO SUNSTONE’S BASIC INSTALLATION GUIDELINES WARRANTY ON PARTS_________________________________________________________________________ MAIN BURNERS ------------------------------------------ LIMITED LIFETIME COOKING GRATES ----------------------------------------LIMITED LIFETIME FIREBOX & PANELS -------------------------------------- LIMITED LIFETIME VALVES, KNOBS, LIGHTS & ALL OTHER PARTS -----1 YEAR W