
Operation Manual


9VR2 Contoller Rev.A
ENGLISH
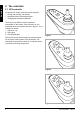
Figure 5 Electrical adjustment options
4. Operating the electrical
adjustment options
Not every wheelchair has been equipped with
electronic adjustment options. We make a
distinction between four different adjustment
options to the seating system:
• Tilt adjustments
• High/low adjustments
• Backrest adjustments
• Legrest adjustments
To use electrical adjustment options, the VR2
Seats&Lights controller is required (maximum
of two options).
4.1 Selecting the desired adjustment option
1. Switch on the controller
2. Press on the ‘mode’ button (E in gure 4) to select the ‘adjustment options’ mode. The controller
will now be in the ‘adjustment options’ mode. It is also possible to follow the status.
The joystick is used to select and operate the electronic adjustment options.
3. Move the joystick to the left or the right to select the desired adjustment option. The selected
adjustment option will be visible on the display screen.
4. Moving the joystick forwards and/or backwards will activate the selected electronic adjustment
option (see table 6). Move the joystick forwards or backwards until the desired adjustment option
has been attained.
Move joystick backwards Move joystick forwards
Tilt adjustment The entire chair will tilt
backwards
The entire chair will tilt forwards
High/low adjustments The entire chair will be raised The entire chair will be lowered
Backrest adjustments The backrest will tilt backwards The backrest will tilt forwards
Legrest adjustments The legrest angle will increase,
the footplate will be raised
The legrest angle will decrease,
the footplate will be lowered
5. To return to the ‘drive’ mode: Press on the ‘mode’ button to select the ‘drive’ mode.
Note: If you adjust the seat height by using the high/low option or use the electrical tilt adjustment 0 -
45°, the speed will be reduced due to safety reasons.
Table 1 Electrical adjustments