Quickie LXI User Instruction Manual & Warranty SUPPLIER: THIS MANUAL MUST BE GIVEN TO THE RIDER OF THIS WHEELCHAIR. RIDER: BEFORE USING THIS WHEELCHAIR READ THIS ENTIRE MANUAL AND SAVE FOR FUTURE REFERENCE.
I. INTRODUCTION QUICKIE LISTENS Thank you for choosing a Quickie wheelchair. We want to hear your questions or comments about this manual, the safety and reliability of your chair, and the service you receive from your Quickie supplier. Please feel free to write or call us at the address and telephone number below: Sunrise Medical Customer Service Department 7477 East Dry Creek Parkway Longmont, CO 80503 (303) 218-4500 Be sure to return your warranty card, and let us know if you change your address.
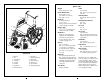
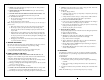
I I . YO U R CHAIR AND ITS I I . YO U R PA RT S CHAIR AND ITS PA RT S Quickie LXI Axles Std - threaded Opt - quick -release, quad-release axle nuts Weight 28 lbs. with steel rear axles Frame Dimensions Frame width: 12”- 20” (seat width 1/2” narrower) Sling depth: 12”-18” 1 Backrest 8o with push handles 16”-19”, 14”-17” Backrest options: solid back, backrest cushion, straight push handles 2 3 6 4 11 9 12 7 9 10 5 12 8 13 14 QUICKIE LXI 1. 2. 3. 4. 5. 6. 7. 8. 9.
I I I . TA B L E OF 1. INTRODUCTION .............................................................................. a. Quickie Listens .................................................................................... II. YOUR CHAIR AND ITS PARTS ................................................ I11. TABLE OF CONTENTS .................................................................. IV. NOTICE - READ BEFORE USE .................................................. a.
I V. N O T I C E — R E A D BEFORE USE A. CHOOSE THE RIGHT CHAIR & SAFETY OPTIONS Quickie provides a choice of many wheelchair styles to meet the needs of the wheelchair rider. However, final selection of the type of wheelchair, options and adjustments rests solely with you and your health care advisor. Choosing the best chair and set-up for your safety depends on such things as: 1. Your disability, strength, balance and coordination. 2.
! ▲ V. G E N E R A L WA R N I N G S F. CHANGES & ADJUSTMENTS If you modify or adjust this chair, it may increase the risk of a tip-over UNLESS you make other changes as well. 1. Consult your authorized Quickie supplier BEFORE you modify or adjust your chair. 2. We recommend that you use anti-tip tubes until you adapt to the change, and are sure you are not at risk to tip over. G. ENVIRONMENTAL CONDITIONS 1. Use extra care if you must ride your chair on a wet or slick surface.
! ▲ V I I . WA R N I N G S : FA L L S ! ▲ & TIP-OVERS WA R N I N G S Heed all warnings in this section. If you fail to do so a fall, tip-over or loss of control may occur and cause severe injury to the rider or others. A. CENTER OF BALANCE The point where this chair will tip forward, back, or to the side depends on its center of balance and stability. How your chair is set up, the options you select and the changes you make, may affect the risk of a fall or tip-over. 1.
! ▲ V I I . WA R N I N G S : FA L L S & TIP-OVERS 3. NEVER reach with both hands (you may not be able to catch yourself to prevent a fall if the chair tips). 4. NEVER REACH OR LEAN TO THE REAR unless your chair has anti-tip tubes locked in place. 5. DO NOT REACH OR LEAN OVER THE TOP OF THE SEAT BACK. This may damage one or both backrest tubes and cause you to fall. 6. If You Must Reach Or Lean: a. Do not lock the rear wheels. This creates a tip point and makes a fall or tip-over more likely. b.
! ▲ V I I . WA R N I N G S : FA L L S & TIP-OVERS 3. Make sure to keep pneumatic tires properly inflated. Low tire pressure may allow the rear wheel locks to slip. 4. Move your chair as close as as you can to the seat you are transferring to. If possible, use a transfer board. 5. Rotate the front casters until they are as far forward as possible. 6. If you can, remove or swing footrests out of the way. a. Make sure your feet do not catch in the space between the footrests. b.
V I I . WA R N I N G S : C O M P O N E N T S & O P T I O N S ! ▲ D. FASTENERS Many of the screws, bolts and nuts on this chair are special high-strength fasteners. Use of improper fasteners may cause your chair to fail. 1. ONLY use fasteners provided by an authorized Quickie supplier (or ones of the same type and strength, as indicated by the markings on the heads). 2. Over- or under-tightened fasteners may fail or cause damage to chair parts. 3.
! V I I . WA R N I N G S : C O M P O N E N T S & O P T I O N S ▲ 2. To keep the rear wheels from rolling, always set both rear wheel locks when you transfer to or from your chair. 3. Low pressure in a rear tire may cause the wheel lock on that side to slip and may allow the wheel to turn when you do not expect it. 4. Make sure lock arms embed in tires at least 3/8 inch when locked. If you fail to do so, the locks may not work. M.
VIII. TIPS FOR AT T E N D A N T S C. CLIMBING A CURB OR SINGLE STEP Follow these steps to help the rider climb a curb or single step going FORWARD: 1. Stay behind the chair. 2. Face the curb and tilt the chair up on the rear wheels so that the front casters clear the curb or step. 3. Move forward, placing the front casters on the upper level as soon as you are sure they are past the edge. 4. Continue forward until the rear wheels contact the face of the curb or step.
IX. SET UP & IX. SET ADJUSTMENT B. TOE-IN AND TOE-OUT Toe-in and Toe-out terms are terms that relate to how well the rear wheels of the chair are aligned. This will affect how well the chair will roll. Drag or resistance occurs in a wheelchair when the rear wheels are not properly aligned. ADJUSTMENT 1. Installation a. Place swing-away pivot saddle into the receiver on front frame tube with the footrest facing outward from the frame. b.
IX. SET UP & ADJUSTMENT G. FLIP-BACK ARMRESTS Flip-back armrests are shipped standard on Quickie LXI wheelchairs. They are installed at Quickie. UP & ADJUSTMENT I. HEIGHT-ADJUSTABLE ARMRESTS (Optional) 4 1. Installation a. Slide the outer armpost into the receiver mounted to the wheelchair frame. b. The armrest will automatically lock into place. 1. Flipping Armrests Back a. To flip armrests back, depress the release latch and pull arm toward back of wheelchair. 2. Height Adjustment a.
IX. SET UP & ADJUSTMENT K. CASTER PLATES Note: Use a torque setting of 75-80 in./lbs. when adjusting caster angle. 1. Angle Adjustment a. Loosen the two eccentric bolts that secure the caster assembly. Do not remove the clevis pin. b. Place a large right triangle against the table surface and the front surface of the caster bearing housing. This will align the caster stem rotational axis perpendicular to the floor surface. c. When alignment is satisfactory, retighten the two eccentric bolts. d.
IX. SET UP & ADJUSTMENT g. Insert it into the anti-tip tube receiver. h. Turn the anti-tip tube down until release pin is through the receiver mounting hole. i. Insert second anti-tip tube the same way. 3. Adjusting Anti-Tip Tube Wheel The anti-tip tube wheels may have to be raised or lowered to achieve proper clearance 1 1/2” to 2”. a. Press the anti-tip wheel release button so that both release pins are drawn inside. b. Raise or lower to one of the three predrilled holes. c. Release button. d.
IX. SET UP & ADJUSTMENT X. TROUBLESHOOTING You will need to adjust your chair from time to time for best performance (especially if you alter the original settings). This chart gives you a first solution, then a second and a third if needed. You may need to look farther to find the best solution for a specific problem. Important Note: A front caster angle-adjustment should be made to correspond with any change in seat height. 1. Standard Front Seat Height a.
XI. MAINTENANCE XI. MAINTENANCE A. INTRODUCTION 1. Proper maintenance will improve performance and extend the useful life of your chair. 2. Clean your chair regularly. This will help you find loose or worn parts and make your chair easier to use. 3. Repair or replace loose, worn, bent or damaged parts before using this chair. 4. To protect your investment, have all major maintenance and repair work done by your authorized Quickie supplier. ! ▲ C. MAINTENANCE TIPS 1.
XII. QUICKIE LIMITED WA R R A N T Y A. FOR LIFETIME Quickie warrants the frame and quick-release axles of this wheelchair against defects in materials and workmanship for the life of the original purchaser. The expected life of this frame is five years. B. FOR TWO (2) YEARS We warrant all Quickie-made parts and components of this wheelchair against defects in materials and workmanship for two years from the date of first consumer purchase. C. LIMITATIONS 1.
Sunrise Home Healthcare Group Mobility Products Division 7477 East Dry Creek Parkway • Longmont, Colorado • 80503 USA (303) 218-4500 or (800) 456-8165 in Canada (800) 263-3390 © 1997, Sunrise Medical 1.98 Rev.