TRADITIONAL SAUNA MANUAL HL-100SN HL-400SN HL-200SN HL-300SN HL-500SN 1
Dear Customer, Congratulations on your purchase of a SunRay traditional series sauna. We are confident that you will enjoy the many benefits of using the sauna for years to come. Carefully and thoroughly read this manual in its entirety before using the sauna for the first time. We recommend keeping this manual for regular review and future reference. We use only the finest materials coupled with state-of-the-art construction and the highest safety standard in the industry.
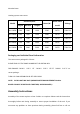
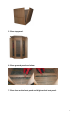
Wooden Room Heating system: sauna stove dimension/mm Sauna stove Model Power/W Voltage model Length Breadth Height HL-100SN 1200 1000 1900 2300 BC23 230V 1N HL-200SN 1500 1050 1900 3000 BC30 230V 1N HL-300SN 1750 1200 1900 3000 BC30 230V 1N HL-400SN 1750 1600 2000 4500 BC45 230V 1N HL-500SN 1750 2000 2000 6000 BC60 230V 1N Packaging and Individual Panel Information The sauna comes packaged in 3 boxes: PLEASE FIND OUT THE SAME NUMBER OF THE CARTON BOX.
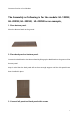
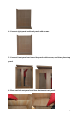
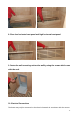
Customer Service or local dealers. The Assembly as following is for the models: HL-100SN, HL-200SN, HL-300SN,HL-200SN as an example。 1. Place bottom panel. Place the Bottom Panel on the ground. 2. Place back panel on bottom panel. Connect the Back Panel to the Bottom Panel by lining up the Back Panel on the groove of the bottom panel. Keep in mind that the back panel will not have enough support until the side panels have been installed in place. 3. Connect left panel and back panel with screws.
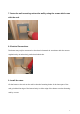
4. Connect right panel and back panel with screws. 5. Connect front panel and two side-panels with screws, and then place top panel. 6. Place vertical seat panel and then horizontal seat panel.
7. Fasten the wall-mounting rack on the wall by using the screws which come with the rack. 8. Electrical Connections. The heater may only be connected to the electrical network in accordance with the current regulations by an authorised, professional electrician. 9. Install the stove. Lift the heater to the rack on the wall so that the fastening hooks of the lower part of the rack go behind the edge of the heater body. Lock the edge of the heater onto the fastening rack by a screw.
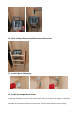
10. Place safety railing around the heater with screws. 11. Install light as following: 12. Install the temperature sensor. Install the temperature sensor on the wall of the sauna room above the heater. It should be installed on the lateral centre line of the heater, 100 mm down-wards from the ceiling.
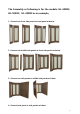
The Assembly as following is for the models: HL-400SN, HL-500SN,HL-400SN as an example。 1. Connect two front side panels to front panel as below. 2. Connect two middle side panels to front side panels as below. 3. Connect two side panels to middle side panels as below. 4. Connect back panel to side panels as below.
5. Place top panel. 6. Place ground panels as below. 7. Place low vertical seat panel and high vertical seat panel.
8. Place low horizontal seat panel and high horizontal seat panel. 9. Fasten the wall-mounting rack on the wall by using the screws which come with the rack. 10.
regulations by an authorised, professional electrician. 11. Install the stove. Lift the heater to the rack on the wall so that the fastening hooks of the lower part of the rack go behind the edge of the heater body. Lock the edge of the heater onto the fastening rack by a screw. 12. Place safety railing around the heater with screws.
13. Install light as following: 14. Install the temperature sensor. Install the temperature sensor on the wall of the sauna room above the heater. It should be installed on the lateral centre line of the heater, 100 mm down-wards from the ceiling. The Assembly as following is for the model: HL-500SN 1. Install side seat as below. 2. Place side seat as below. Warnings 1.
have been given supervision or instruction concerning use of the appliance by a person responsible for their safety. 2. Children should be supervised to ensure that they do not play with the appliance. 3. If the supply cord is damaged, it must be replaced by a special cord or assembly available from the manufacturer or its service agent. 4. Do not hang clothes to dry in the sauna, as this may cause a risk of fire. Excessive moisture content may also cause damage to the electrical equipment.
transfer of ownership. Freight charges to and from the customer are the responsibility of the customer. This includes freight charges for parts shipped to enable the services of your sauna. This warranty is void if the sauna has been altered, misused, or abused. Such instances shall include operation or maintenance of the sauna in deviation to the published instructions.
Maintenance Cleaning Clean the sauna room with a wet cotton towel, dry with a clean dry towel.
benzene, alcohol, or strong cleaning chemicals on sauna. NOTE: Any chemical that can damage wood material will damage the sauna and the protection layer that is on the wood. Transportation and storage 1. Avoid exposure to rain, snow or strong collisions during transport. 2. Do not store in damp environments.
This marking indicates that this product should not be disposed with other household wastes throughout the EU. To prevent possible harm to the environment or human health from uncontrolled waste disposal, recycle it responsibly to promote the sustainable reuse of material resources. To return your used device, please use the return and collection systems or contact the retailer where the product was purchased. They can take this product for environmental safe recycling.