
Use and Care Manual

7
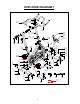
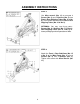
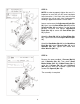
STEP 3:
IMPORTANT! Read instructions carefully,
failure to do so may cause permanent
damage to your bike.
Remove the Left & Right Nylon Nuts (No. 77
& 78) located on the Pedals (No. 80L/R). The
Right Nylon Nut (No. 78) is white on the inside.
The Left Nylon Nut (No. 77) is blue on the
inside. The Pedals (No. 80L/R) are marked L
and R.
Screw the Left Pedal (No. 80L) COUNTER-
CLOCKWISE into the Left Crank (No. 56).
Once properly screwed into place, use the
Wrench (No. 13) to hold the bolt of the pedal
and screw the Left Nylon Nut (No. 77)
CLOCKWISE to the thread end of the Left
Pedal (No. 80L) securely with Spanner (No.
79).
Screw the Right Pedal (No. 80R) CLOCKWISE
into the Right Crank (No. 42). Once properly
screwed into place, use the Wrench (No. 13) to
hold the bolt of the pedal and screw the Right
Nylon Nut (No. 78) COUNTER-CLOCKWISE
to the thread end of the Right Pedal (No. 80R)
securely with Spanner (No. 79).
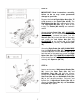
STEP 4:
Loosen and remove 2 Adjustment Knobs (No.
20). Insert the Seat Post (No. 28) and
Handlebar Post (No. 22) into the sleeves
located on the Main Frame (No. 1). Adjust the
Seat Post (No. 28) and Handlebar Post (No.
22) to the desired positions. Re-insert and
tighten the 2 Adjustment Knobs (No. 20) to
secure the Seat Post (No. 28) and Handlebar
Post (No. 22) in place.