BELT DRIVE PRO INDOOR CYCLING BIKE SF-B901B USER MANUAL IMPORTANT! Please retain owner’s manual for maintenance and adjustment instructions. Your satisfaction is very important to us, PLEASE DO NOT RETURN UNTIL YOU HAVE CONTACTED US: support@sunnyhealthfitness.com or 1-877-90SUNNY (877-907-8669).
IMPORTANT SAFETY INFORMATION We thank you for choosing our product. To ensure your safety and health, please use this equipment correctly. It is important to read this entire manual before assembling and using the equipment. Safe and effective use can only be achieved if the equipment is assembled, maintained and used properly. It is your responsibility to ensure that all users of the equipment are informed of all warnings and precautions. 1.
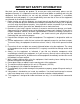
EXPLODED DIAGRAM 1 24 25 26 23 27 22 28 21 20 30 29 20 19 17 18 17 5 16 19 17 6 18 7 17 3 4 15 16 8 3 8 7 7 4 5 80R 10 8 7 11 12 13 79 9 20 29 80L 6 7 5 77 1 3 4 2 3 4 78 31 32 33 8 7 5 2
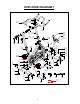
7357 3 1 56 34 49 45 70 19 69 68 67 71 49 34 58 74 44 61 35 36 64 36 54 62 60 36 63 51 53 52 41 42 57 73 64 65 16 66 40 39 72 50 44 37 43 46 55 58 59 53 52 76 48 75 48 47 51 36 47 54 36 36 38 EXPLODED DIAGRAM 2
PARTS LIST No. Description Spec. Qty. No. 1 41 Screw M10*16*S6 4 170“R”9/16 1 Description Spec. Qty. 1 Main Frame 2 Rear Stabilizer 1 42 Right Crank 3 Nut M10*H7*S17 4 43 Belt 4 Foot Pad M10*30*Φ52*49 4 44 Screw 5 End Cap J80*40*1.5 4 45 Wave Washer 1 6 Screw M10*25*S6 4 46 Outer Belt Cover 1 7 Washer d10*Φ20*2 8 47 Washer d6*Φ12*1.2 2 8 Screw M10*15*S6 4 48 Screw M6*12*Φ12 2 1 49 C Clip d20 2 1 50 Nut M12*1*H19.
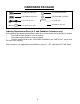
HARDWARE PACKAGE #6 # 6 (M10*25*S6) 4PCS #6 # 7 (d10*Φ20*2) 4PCS #6 # 24 (M10*25*S6) 2PCS #6 # 25 (d10*Φ20*1.5) 2PCS #6 # 13 (S13-15) 1PC #6 # 11(S6) 1PC # 79 (S8-14-22) 1PC # 12 (S14-15-17) 1PC Ordering Replacement Parts (U.S.
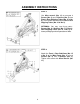
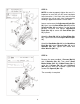
ASSEMBLY INSTRUCTIONS STEP 1: Use Allen wrench (No. 11) to unscrew 4 Screws (No. 8) and 4 Washers (No. 7) from Front & Rear Shipping Tubes (No. 10 & No. 9). Then remove and discard the Front & Rear Shipping Tubes (No. 10 & No. 9). OPTIONAL: You may save these parts: Screws (No. 8), Washers (No. 7), Front & Rear Shipping Tubes (No. 10 & No. 9) for future packaging and transportation of bike. STEP 2: Attach the Front & Rear Stabilizers (No. 15 & No. 2) to the Main Frame (No. 1) using 4 Screws (No.
STEP 3: IMPORTANT! Read instructions carefully, failure to do so may cause permanent damage to your bike. Remove the Left & Right Nylon Nuts (No. 77 & 78) located on the Pedals (No. 80L/R). The Right Nylon Nut (No. 78) is white on the inside. The Left Nylon Nut (No. 77) is blue on the inside. The Pedals (No. 80L/R) are marked L and R. Screw the Left Pedal (No. 80L) COUNTERCLOCKWISE into the Left Crank (No. 56). Once properly screwed into place, use the Wrench (No.
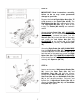
STEP 5: NOTE: In order to properly tighten the seat, it is important to note that you will need two open faced wrenches (1 for each side) and will need to tighten the nut on each side simultaneously working in opposite directions of each other. Loosen and remove the Adjustment Knob (No. 20). Next, insert the Seat Slider (No. 27) into the Seat Post (No. 28) and adjust it to the desired position. Re-insert and tighten Adjustment Knob (No. 20) to secure the Seat Slider (No. 27) in place. Attach the Seat (No.
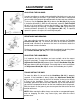
ADJUSTMENT GUIDE ADJUSTING THE BALANCE: In order to achieve a smooth and comfortable ride during use, you must ensure the stability of the bike. If you notice that the bike is unbalanced you can adjust the foot pads located beneath the front and rear stabilizers. To do so, use the Spanner (No. 12) to loosen the Nut (No. 3) by turning it clockwise (direction A). With the nut loosened, rotate the Foot Pad (No. 4) until it sits level with the surface that the bike is on.
PEDAL STRAP ADJUSTMENT Your feet should be secured in the toe clips during exercise. Place your feet as far forward into the toe-clips as you can. With your feet in place, turn the crank to bring one foot to within arm’s reach, grasp the pedal strap and pull it upward to tighten the toe-clip cage, then insert the strap back into the hoop of the toe-clip. Repeat this process to secure your other foot.
MAINTENANCE INSTRUCTIONS This is general information for daily, weekly and monthly maintenance to be performed on your bike. DAILY MAINTENANCE MONTHLY MAINTENANCE After each exercise session, wipe down all the equipment: seat, frame, handlebars. Pay special attention to the seat post, handlebar post and belt/chain guard. Sweat is very corrosive and may cause problems that require parts replacement later. 1.