
Installation & Assembly

February 16 Made in China 9 / 12
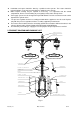
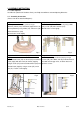
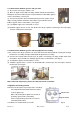
4.1.3 Connections between gas line and gas valve.
(1) Be sure the valve of gas cylinder is on.
(2) Brush or spoon several drops of soapy solution around the connections
through the leak check holes on pole. Inspect whether or not bubbles appear
at these connections. (See Fig.15)
(3) Unscrew and remove cover of control housing, brush or spoon several
drops of soapy solution around the connections. Inspect whether or not
bubbles appear at these connections. (See Fig.16)
(4) If no bubbles appear, the connection is secure.
(5) If bubbles appear, there is a leak. Turn off the valve of gas cylinder, reconnect gas line and engine,
and then conduct leak check again.
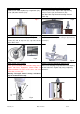
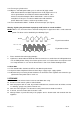
4.1.4 Connections between gas line and left (right) burner assembly.
(1) Be sure the valve of gas cylinder is on. Push and turn on left control knob for checking the leakage
of left burner assembly, and right control knob for right burner assembly.
(2) Unscrew and remove dome décor, brush or spoon several drops of soapy solution around the
connections. Inspect whether or not bulbs appear at these connections. (See Fig.17)
(3) If no bubbles appear, the connection is secure.
(4) If bubbles appear, there is a leak. Turn off control knob, reconnect gas line and engine, and then
conduct leak check again.
Note: If the leak still persists, please call
1-866-578-0101 for assistance.
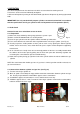
4.2 Ignition and setting control
4.2.1 Unscrew the igniter cap and put 1 AA 1.5V battery
into compartment with anode outward, and then
reset the igniter cap.
Note: If the battery of the igniter has run out of
electricity, replace with a new battery.
Please remove battery when not in use for an
extended period of time.
4.2.2 Make sure control knobs are at OFF.
Fig.15
Fig.16
Fig.17
Igniter button
Control knob
Fig.18