
Installation & Assembly

February 16 Made in China 8 / 12
4. OPERATION
This dual head patio heater has two heat units which are convenient for warming oneself.
The burners can be turned on individually or together.
Left burner will operate by turning on left control knob, right burner will operate by turning right control
knob.
IMPORTANT: Use only standard 20 lb propane cylinder constructed and marked in accordance
with the specifications for LP-gas cylinder of the U.S. Department of Transportation (D.O.T.).
4.1 Leak check
Caution: Do not use a naked flame to test for leaks.
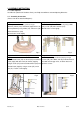
4.1.1 Preparation
(1) Make leak check solution by mixing soap and water 1 part to 1 part.
(2) Make sure BOTH Control Knobs are at OFF position.
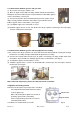
(3) Place the gas cylinder inside the cylinder cabinet and hook up it with chain.
(4) Then screw clockwise the connecter of the regulator into the valve of gas cylinder. (See Fig.13)
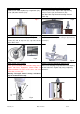
(5) Visually inspect the visible portions of hose prior to each use by opening the door of cylinder
cabinet. If there are breaks, wear, and/or abrasion, please replace it with component supplied by
manufacturer.
(6) On an annual basis visually check at least annually portions of the hose assembly located within
the confines of the heater post by pulling out the hose from post after detaching regulator and
unscrewing the screws between post and control housing.
(7) Hook chain up after placing gas cylinder inside of the cylinder cabinet in order to stabilize the gas
cylinder.
NOTE: Be careful not to kink flexible gas hose. If gas hose is kinked, gas flow could be reduced, or a
gas leak could occur.
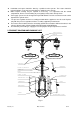
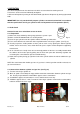
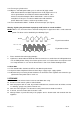
4.1.2 Connections between cylinder and gas line. (See Fig.14)
(1) Turn the valve of gas cylinder on.
(2) Brush or spoon several drops of soapy solution around the connections between cylinder and gas
line. Visually inspect whether or not bubbles appear at these connections.
(3) If no bubbles appear, the connection is secure, continue to the next step.
(4) If bubbles appear, there is a leak. Turn off the valve of gas cylinder, reconnect these connections,
and then conduct leak check again.
Fig.13
Fig.14