
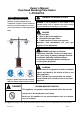
Installation & Assembly

February 16 Made in China 6 / 12
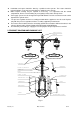
3. ASSEMBLY INSTRUCTION
3.1 Tools required
One Wrench (attached in Hardware Pack), one Philip Screw Driver and two Adjusting Wrenches.
3.2 Assembly Instructions
(Please refer to the attached Diagrams)
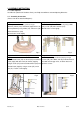
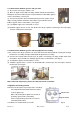
Step1. Install 4 Shanks
Carefully install Shank (left) (chain & hinges
attached), Shank (rear) and Shank (right) on base at
correct position by using 4 bolts (LA), 4 washers (LG)
and 4 lock washers (LM).
Do not fasten screws tightly.
Step2. Install Table Top Base
Install Table Top Base on Shanks by using 8 bolts
(LA), 8 nuts (LB) and 8 washers (LG).
Do not fasten screws tightly.
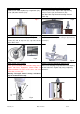
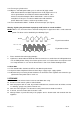
Step3. Install Shroud Panel (left), Shroud Panel
(right).
Install Shroud Panel (left) on Shank (left) and Shroud
Panel (right) (with lock catch) on Shank (right) by
using 6 screws (LE), Connect Shroud Panel (left) and
Shroud Panel (right) by using 2 screws (LE) and 2
nuts (LL). Fasten screws tightly.
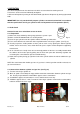
Step4. Install Door
Attach Door to hinge of Shank (left) by using 6
screws (LD), close Door, and adjust Shroud Panels
and door until no gap exists, and then fasten all
previous screws.
Fig.3
Fig.4
Fig.5 Fig.6
*.***