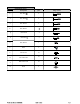
PARTS LIST Label Description QTY A Front leg 2 B Back leg 2 C Top support 1 1 D Top support 2 1 E Bottom support 2 F Back support 1 1 G Back support 2 1 I Handrail 2 J Seat 1 K Canopy side support 2 L Canopy support 2 M Canopy 1 N Cushion 1 Image of Part
HARDWARE PACK Label Description QTY U Bolt M6x 4 T Bolt M6x8 2 S Bolt M6x68 4 R Bolt M6x62 Q Bolt M6x50 4 P Bolt M6x4 2 O Bolt M6x30 1 Y Knob 2 V M6 Nut Nut 23 W Flat washer M6 23 Z Ball head nut M6 23 H Hook 2 Image of Part
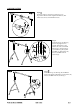
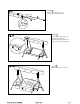
ASSEMBLY STEPS Step1 Insert Top support 1 (D) into Top support 2 (C) as Fig.1shows and attach them together with Bolt (P), Flat washer (W), Nut (V) and Ball head nut (Z). Step 2: Attach Front leg (A), Back leg (B) and Top support (D/C) together with Bolt (U), Flat washer (W), Nut (V) and Ball head nut (Z). Attach Front leg (A) and Back leg (B) together with Bolt (T), Flat washer (W), Nut (V) and Ball head nut (Z).See Fig.2.
Step 4 Insert Back support 1 (F) into Back support 2 (G) and secure them with Bolt (O), Flat washer (W), nut (V) and Ball head nut (Z). See Fig.4. Step 5 Attach Back supports (F/G) and Back leg (B) together with Bolt (S), Flat washer (W), nut (V) and Ball head nut (Z). See Fig.5. Step 6 Attach Handrail (I) and Seat (J) together with Bolt (R), Flat washer (W), nut (V) and Ball head nut (Z). See Fig.6.
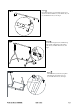
Step 7 Attach Handrail (I) and Seat (J) together with Bolt (R1), Flat washer (W), nut (V) and Ball head nut (Z). See Fig.7. Step 8 Attach one end of Hook (H) to Handrail (I) and the other end to Top support (D/C). See Fig.8. Step 9 Attach Top support (D/C) and Canopy side panel (K) together with Knob (Y). See Fig.9.
Step 10 Insert Canopy support (L) into Canopy (M) as Fig.10arros show. Step 11 Insert Canopy support (L) into Canopy side support (K) following the arrow direction on Fig. 11, then spread Canopy (M). Step 12 Attach Cushion (N) on Seat (J).
Care & Maintenance: Before using, clean the product completely with a soft dry towel. When not in use, wipe free of any dirt or loose objects, wash with a mild solution of soap and water; rinse thoroughly and dry completely. Do not use strong detergent or abrasive cleaners. Steel components of garden accessories and furniture are treated with rust inhibiting paint. However, due to the nature of steel, surface oxidation (rusting) will occur if this protective coating is scratched.