
User Manual


96
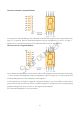
Lesson 14 Driving 7-Segment Display by 74HC595
Introduction
Since we've got some knowledge of the 74HC595 in the previous lesson, now let's try to use
it and driv e a 7-segment display to show a figure from 0 to 9 and A to F.
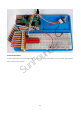
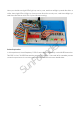
Components
- 1 * Raspberry Pi
- 1 * Breadboard
- 1 * 74HC595
- 1 * 7-segment display
- 1 * Resistor (220Ω)
- Jumper wires
Principle
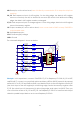
7-Segment Display
A 7-segment display is an 8-shaped component w hich packages 7 LEDs. Each LED is called
a segment – w hen energized, one segment forms part of a numeral (both decimal and
hexadecimal) to be displayed. An additional 8th LED is sometimes used within the same
package thus allowing the indication of a decimal point (DP) when two or more 7-segment
displays are connected together to display numbers greater than ten.
Each of the LEDs in the display is given a positional segment with one of its connection pins
led out from the rectangular plastic package. These LED pins are labeled from "a" through
to "g" representing each individual LED. The other LED pins are connected together forming
a common pin. So by forward biasing the appropriate pins of the LED segments in a particular
order, some segments will brighten and others stay dim, thus show ing the corresponding
character on the display.
The common pin of the display generally tells its type. There are two types of pin connection:
a pin of connected cathodes and one of connected anodes, indicating Common Cathode
(CC) and Common Anode (CA). As the name suggests, a CC display has all the cathodes
of the 7 LEDs connected when a CA display has all the anodes of the 7 segments connected.
SunFounder