
User Manual


82
For C language users:
Step 2: Get into the folder of the code
cd /home/pi/SunFounder_Super_Kit_V3.0_for_Raspberry_Pi/C
Step 3: Compile
make 11_motor
Step 4: Run the executable file above.
sudo ./11_motor
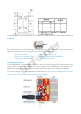
Code Explanation
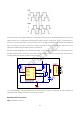
digitalWrite(MotorEnable, HIGH): // Enable the L239D
digitalWrite(MotorPin1, HIGH):) // Set a high level for 2A(pin 7); since 1,2EN(pin 1) is
in high level, 2Y will output high level
digitalWrite(MotorPin2, LOW): // Set a low level for 1A, then 1Y will output low level,
and the motor will rotate.
for(i=0;i<3;i++){
delay(1000);
} // this loop is to delay for 3*1000ms
digitalWrite(MotorEnable, LOW) // If 1,2EN (pin1) is in low level, L293D does not work.
Motor stops rotating.
digitalWrite(MotorPin1, LOW)
digitalWrite(MotorPin2, HIGH) // Reverse the current flow of the motor, then the motor
will rotate reversely.
For Python users:
Step 2: Get into the folder of the code
cd /home/pi/SunFounder_Super_Kit_V3.0_for_Raspberry_Pi/Python
Step 3: Run
sudo python 11_motor.py
Code Explanation
GPIO.setup(MotorPin1, GPIO.OUT) # Set pin1 and pin2 for motor’s rotation direction
as output pin
GPIO.setup(MotorPin2, GPIO.OUT)
GPIO.setup(MotorEnable, GPIO.OUT) # Set pins for motor’s working condition as
output pin
GPIO.output(MotorEnable, GPIO.LOW) # Set the motor low level for initial state
GPIO.output(MotorEnable, GPIO.HIGH) # Set the motor in high level
GPIO.output(MotorPin1, GPIO.HIGH) # Set pin1 in high level and pin2 in low level
SunFounder