
User Manual

43
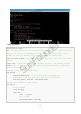
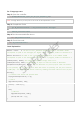
For C language users:
Step 2: Open the code file:
cd /home/pi/SunFounder_Super_Kit_V3.0_for_Raspberry_Pi/C
Note: Change directory to the path of the code in this experiment via cd.
Step 3: Compile the Code
gcc 02_buttonControlLed.c -o 02_buttonControlLed -lwiringPi
or
make 02_buttonControlLed
Step 4: Run the executable file above
sudo ./02_buttonControlLed
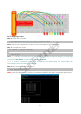
Step 5: Check the code
nano 02_buttonControlLed.c
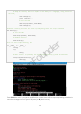
Code Explanation
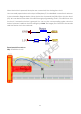
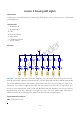
#define LedPin 0 Pin B17 in the T_Extension Board connects to the GPIO0. GPIO0
corresponds to pin0 in the wiringPi pin figure. So in C program, LedPin is defined as 0.
#define ButtonPin 1 Pin B18 in the T_Extension Board connects to the GPIO8. GPIO8
corresponds to pin1 in the wiringPi pin figure. So in C program, LedPin is defined as 1.
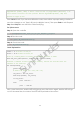
pinMode(LedPin, OUTPUT) Set LedPin as output to assign value to it.
pinMode(ButtonPin, INPUT) Set ButtonPin as input to read the value of ButtonPin.
pullUpDnControl(ButtonPin, PUD_UP) Set the ButtonPin as pull-up input. When the button
is not pressed, the I/O port is 3.3V. When the button is pressed, the I/O port connects
to GND (OV). You can judge the button status by reading the level value of the I/O port.
while(1){
// indicate that button has pressed down
if(digitalRead(ButtonPin) == 0){
// LED on
digitalWrite(LedPin, LOW);
printf("...LED on\n");
}
else{
// LED off
digitalWrite(LedPin, HIGH);
printf("LED off...\n");
}
SunFounder