
User Manual

32
Lesson 1 Blinking LED
Introduction
In this lesson, we will learn how to program Raspberry Pi to make an LED blink. You can play
numerous tricks with an LED as you want. Now get to start and you will enjoy the fun of DIY
at once!
Components
- 1 * Raspberry Pi
- 1 * Breadboard
- 1 * T-Extension Board
- 1 * 40-Pin Cable
- 1 * LED
- 1 * Resistor (220Ω)
- Jumper wires
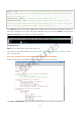
Principle
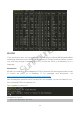
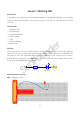
In this experiment, connect a 220Ω resistor to the anode (the long pin of the LED), then the
resistor to 3.3 V, and connect the cathode (the short pin) of the LED to B17 of Raspberry Pi.
We can see from the schematic diagram that the anode of LED connects to a current-
limiting resistor and then to 3.3V. Therefore, to turn on an LED, w e need to make B17 low (0V)
lev el. It can be realized by programming.
Experimental Procedures
Step 1: Build the circuit
SunFounder